Introduction. An "image projection" is a method by which the three dimensional world is displayed on a two dimensional surface such as a print or computer monitor. Cartographers have been using image projections (also known as map projections) for centuries to display the image of the three dimensional world on two dimensional maps. Most camera lenses use "rectilinear" (or in some cases "fisheye") projection to project the three dimensional world onto the two dimensional film or digital sensor.
Unfortunately, it is mathematically impossible to dispay all two dimensional images of three dimensional scenes and simultaneously ensure that all straight lines in the scene will be rendered as straight in the image. For images with a relatively narrow field of view (FOV), this is possible using rectilinear projection (also known as gnomonic projection). However, as a practical matter, rectilinear projection is not well suited to displaying images with a FOV of more than about 100 or 120 degrees because of the way in which it stretches images towards the edges. Fisheye projection can capture and display images with up to 180 degrees, but straight lines in the scene are generally not displayed as straight in an image using fisheye projection.
As panoramic photographers know, many interesting images encompass far more than 120 or even 180 degrees. In these cases, alternate projections must be employed to display the scene on a two dimensional surface. When creating stitched images, PTAssembler can create images using rectilinear projection, fisheye projection or a large number of other projections not typically possible using conventional camera lenses. The Cambridge in Colour website offers an excellent article about many image projections that are used by PTAssembler and other stitching programs. It is excellent reading as background for the rest of this article.
PTAssembler Projection Overview. The table below shows a summary of the projections currently offered by PTAssembler.
| Projection Name | Maximum Field of View | Straight Lines | Notes | More Info | ||
|---|---|---|---|---|---|---|
| Horizontal | Vertical | Horizontal | Vertical | |||
| Rectilinear | <180 | <180 | Yes | Yes | Used by most conventional camera lenses | Mathworld |
| Cylindrical | Unlimited | <180 | No | Yes | Used by many scanning cameras | Mathworld |
| Equirectangular | Unlimited | Unlimited | No | Yes | The simplest projection possible | Mathworld |
| Fisheye | <180 | <180 | No | No | Used by many common fisheye lenses | Mathworld |
| Stereographic | Unlimited | Unlimited | No | No | Mathworld | |
| Mercator | Unlimited | <180 | No | Yes | Mathworld | |
| Transverse Mercator | <180 | <180 | Yes | No | One of few projections with straight horizontal lines | Mathworld |
| Sinusoidal | <360 | <180 | No | No | Mathworld | |
| Miller Cylindrical | Unlimited | <180 | No | Yes | Mathworld | |
| Lamert Azimuthal Equal Area | <180 | <180 | No | No | Mathworld | |
| Orthgraphic | <180 | <180 | No | No | Mathworld | |
| Cassini | <180 | <180 | No | No | Mathworld | |
| Recti-Perspective | <360 | <180 | No | Yes | Modified rectilinear projection. Vertical and radial lines are straight. Useful for "perspective" scenes. | This Page |
| Trans Merc Rectilinear | <180 | <180 | Yes | Yes | Similar to rectilinear, but less stretched towards edges | This Page |
| Compressed Rectilinear | <180 | <180 | Yes | Yes | Similar to rectilinear, but user-configurable compression over entire image | This Page |
| Squeezed Rectilinear | Varies | Varies | Yes | Yes | Rectilinear in center, "squeezed" towards edges | This Page |
| Recti Cylindrical | Unlimited | <180 | Yes* | Yes* | Rectilinear in center, transitioning to cylindrical elsewhere | This Page |
| Rectilindrical | Unlimited | <180 | No | Yes | Configurable projection, allows control over degree to which yaw and pitch is compressed or expanded. Can be configured to produce rectilinear, cylindrical, equirectangular and intermediate projections. | This Page |
| Cylindrical Equal Area | Unlimited | <180 | No | Yes | Configurable Cylindrical Equal Area projection | Mathworld |
| Lambert Cylindrical Equal Area | Unlimited | <180 | No | Yes | Cylindrical Equal Area (standard lat=0 degrees) | Mathworld |
| Behrmann Cylindrical Equal Area | Unlimited | <180 | No | Yes | Cylindrical Equal Area (standard lat=30 degrees) | Mathworld |
| Cylindrical Equidistant | Unlimited | <180 | No | Yes | Configurable Cylindrical Equidistant projection | Mathworld |
| Miller 1 Equidistant | Unlimited | <180 | No | Yes | Cylindrical Equidistant projection (standard lat=30.3 degrees) | Mathworld |
| Miller 2 Equidistant | Unlimited | <180 | No | Yes | Cylindrical Equidistant projection (standard lat=43.0 degrees) | Mathworld |
| Miller 3 Equidistant | Unlimited | <180 | No | Yes | Cylindrical Equidistant projection (standard lat=50.5 degrees) | Mathworld |
| User Defined | Varies | Varies | Varies | Varies | User specified projection equations | This Page |
| Hybrid | Varies | Varies | Varies | Varies | User defined combination of four projections...one in each quadrant | This Page |
| Notes: * Only in rectilinear region (central) of image | ||||||
The rest of this article illustrates two popular/common projections used by many stitching software programs (rectilinear and cylindrical) and several of the more unusual projections described in the table above. For information on many common projections, the Cambridge in Colour article is an excellent resource, as are the Mathworld pages (linked above) that describe each projection. In many of the pictures below, white grid lines are superimposed on the image. These lines show 10 degree increments. The red and blue lines show the central lines of each image, the location where yaw equals 0 degrees (blue line) and pitch equals 0 degrees (red line). Or, in cartographers' terms, the prime meridian (blue line) and the equator (red line). The intersection of these two lines is considered to be the center of the projection.
Rectilinear projection is instantly familiar to anyone who has used a camera...it is the projection used by almost all camera lenses. As mentioned above, the "problem" with rectilinear projection is that it isn't well suited to displaying images with a large FOV. In this picture of the Federal Reserve in Washingtion, DC, the edges of the image are unacceptably stretched. This is an unavoidable consequence of the projection, a result of the fact that all straight lines in the scene are rendered as straight in the image.

Rectilinear Projection, 150 degree FOV.
An alternate choice to rectilinear, and a popular one for displaying wide images such as this, is cylindrical projection. Cylindrical projection has a big advantage in that it can display images with 360 degrees (or larger). There is no "stretching" of the image as one moves left or right from the center of the image. However, its big disadvantage is that while vertical lines are rendered as straight lines (see the doors and windows in the buildling), the only horizontal line that is rendered as straight is the central one (the "equator", or red line in this picture). All other horizontal lines (e.g. the top of the buildling, the lines in the sidewalk) are curved. As a result, it isn't very well suited for displaying architectural images such as this one.
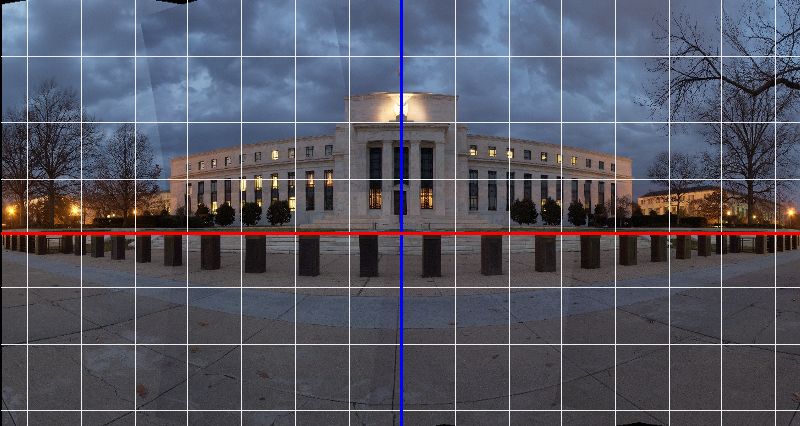
Cylindrical Projection, 150 degree FOV.
This is the first and simplest of three projections (also including Compressed Rectilinear and Squeezed Rectilinear) that are "modified" versions of standard rectilinear projection.
This projection is similar to rectilinear in that both horizontal and vertical lines are rendered as straight throughout the image. It is also constrained to showing images with less than 180 degree FOV. However, it does not stretch the image nearly as much as rectilinear towards the images. As a result, it is well suited to displaying images with a FOV of more than 120 degrees (the example here is 150 degrees). The "compromise" that is made by this projection is that diagonal lines are not rendered as straight lines as they are by rectilinear projection. For example, the diagonal roof line of the buildling towards the right edge of the image is not quite straight. The degree to which diagonal lines are curved depends on their distance from the center of the image. Depending on the FOV and subject matter, this curvature may not be particularly noticable or objectionable.
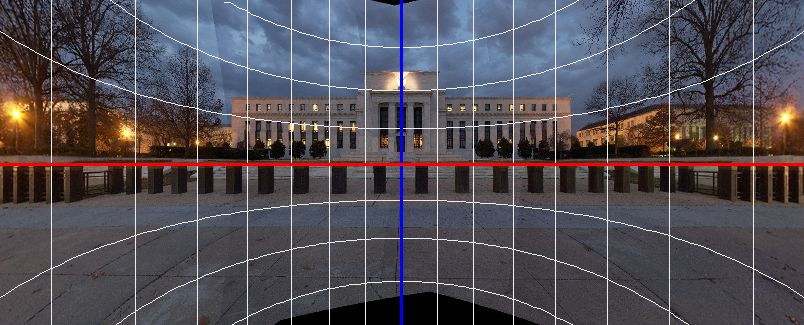
Trans Merc Rectilinear Projection, 150 degree FOV.
A larger version of this image is on display in my image gallery.
Unlike Squeezed Rectilinear and Compressed Rectilinear (see below), there are no options to configure for this projection.
Like Trans Merc Rectilinear projection, this projection is useful for displaying scenes with a wide field of view (up to 180 degrees) where it is important that horizontal and vertical lines are displayed as straight.
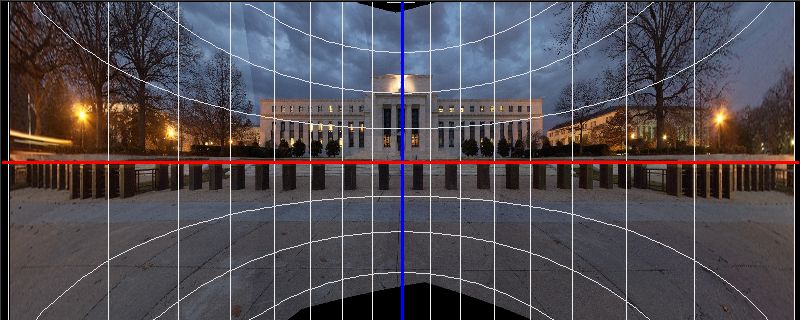
Compressed Rectilinear Projection, 160 degree FOV.
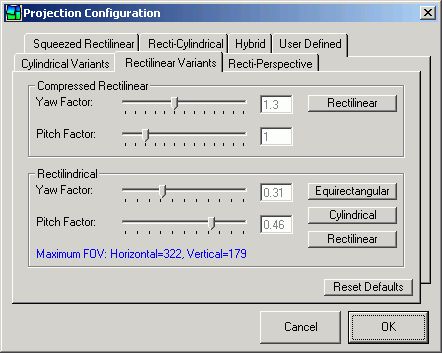
PTAssembler Compressed Rectilinear Projection Configuration dialog
For more information on the mathematics of compressed rectilinear projection, please consult this document.
This projection is identical to rectilinear in the (user defined) central region, but becomes progressively more "squeezed" as distance increases from the center of the image. In many respects it is similar in apperance to the Trans Merc Rectilinear and Compressed Rectilinear projections described above. However, because it is identical to rectilinear in the central region, all lines (horitonztal, vertical and diagonal) are rendered as straight in the central region, which is not the case with the other two projections.
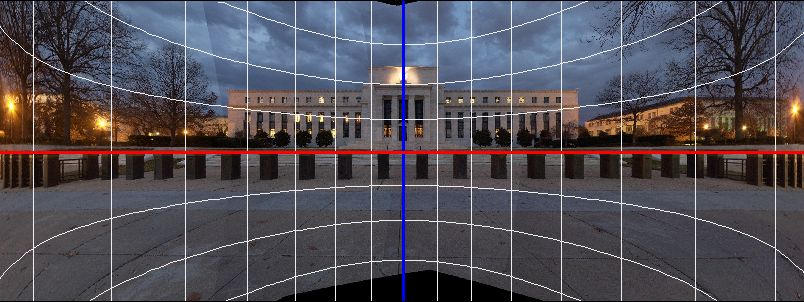
Squeezed Rectilinear Projection, 150 degree FOV.
PTAssembler allows the user to configure the size of the central rectilinear region using the projection configuration dialog. In this example, the point at which "squeezing" begins along the horizontal axis is 40 degrees left and/or right of the center. The amount by which the image is squeezed can also be adjusted. In this case, a relatively modest amount of squeezing was employed. Although not relevant in this image, it is also possible to "squeeze" the image along the vertical dimension, which is useful for images that encompass a large vertical field of view.
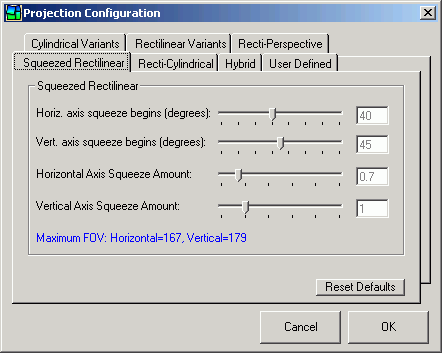
PTAssembler Squeezed Rectilinear Projection Configuration dialog
This projection is useful for displaying very wide angle "perspective" images...images where there are obiouvs lines converging to a vanishing point in the center of the image. This projection can display very wide fields of view (up to 360 degrees), and ensure that all radial lines (lines that pass through the central point of the image) are rendered as straight. Vertical lines are also rendered as straight, but the horizon is the only horizontal lines rendered as straight. Regions close to the center of the image, closely resemble standard recilinear projection.
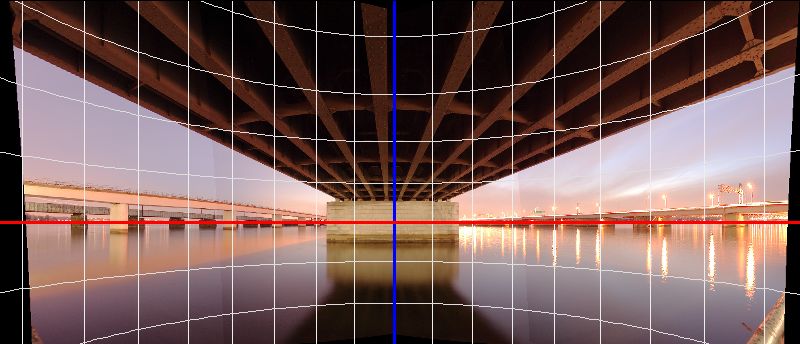
Recti-Perspective Projection, approx 170 degree FOV.
In this image of the 14th street bridge in Washington, DC, all lines that converge to the vanishing point in the center of the image are rendered as straight, despite the fact that this scene covers slightly less than 170 degrees.
Like Compressed Rectilinear projection, PTAssembler offers the ability to adjust the amount of compression in the horizontal (yaw) and vertical (pitch) directions. When both the yaw and pitch sliders are set to values of 1, the projection is identical to rectilinear. As the yaw factor is increased, images with progressively larger FOV can be displayed. The edges of the image become progressively less stretched, and radial lines stay straight. However, as the yaw factor is increased, horizontal lines above and below the horizon show progressively more curvature. Adjusting the pitch factor stretches or compresses the image in the vertical direction.
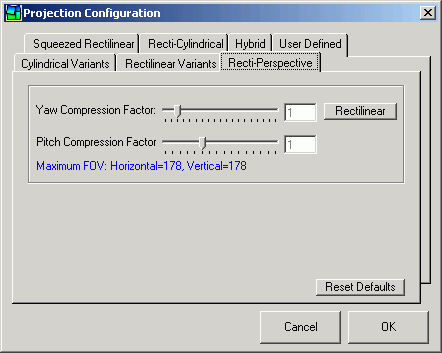
PTAssembler Recti-Perspective Projection Configuration dialog
The image below also uses Recti-Perspective projection, but uses a smaller value for the yaw factor (1.4 compared to 2.0 above), which produces a slightly more horizontally stretched image.

Recti-Perspective Projection, approx 170 degree FOV.
When I photographed this scene five years ago, cylindrical projection was the best available alternative at the time. However, cylindrical projection shows very obvious bowing of the radial lines, leading to a very distorted view of the bridge. A cylindrical version of this scene is show below.
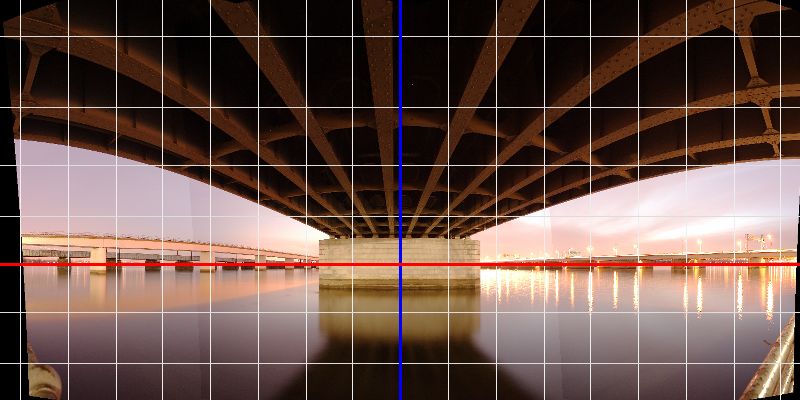
Cylindrical Projection, approx 170 degree FOV.
The other alternative available to me five years ago was rectilinear projection. While this renders all straight lines as straight, the stretching towards the edge of the images was unacceptable.

Rectilinear Projection, approx 160 degree FOV.
For more information on the mathematics of recti-perspective projection, please consult this document.
This is a highly configurable projection, allowing for adjustments to the yaw and pitch components of the projection. It can be configured to produce results that are identical to rectilinear, cylindrical, equirectangular, lambert cylindrical and a range of intermediate projections.

PTAssembler Rectilindrical configuration dialog
The yaw component can be configured to produce a result (along the horizontal axis) that is visually identical to standard cylindrical (yaw factor=0) or rectilinear (yaw factor=1) projections. Values between 0 and 1 produce a blend of rectilinear and cylindrical projections.
The degree to which the top and bottom of the image (i.e. regions closer to the "poles" than the "equator") is compressed or expanded can be configured. At one extreme (where the pitch factor=1), the top/bottom of the image extend towards infinity. This produces a result that is visually identical the standard cylindrical or rectilinear projections illustrated above.
When the pitch factor=0, the top/bottom of the image is neither expanded nor compressed. This produces a result that is visually identical to the standard equirectangular projection, a specific type of cylindrical equidistant projection.
At the other extreme (where the pitch factor=-1), the top/bottom of the image is extremely compressed, producing a result that is visually identical to the lambert cylindrical equal area projection, a specific type of cylindrical equal area projection.
The following table shows the combination of factors necessary to produce several "standard" projections:
| Projection | Yaw Factor | Pitch Factor |
|---|---|---|
| Rectilinear | 1 | 1 |
| Cylindrical | 0 | 1 |
| Equirectangular | 0 | 0 |
| Lambert Cylindrical | 0 | -1 |
When the yaw factor is set to zero, adjustments to the pitch factor retain a uniform ratio of width/height (1:1) at the center (along the equator) of the image. This is not generally true for the other configurable cylindrical projections (cylindrical equal area and cylindrical equidistant). As such, rectilindrical projection is often a better choice for realistic representation of photographic images, compared to the other cylindrical projections, which may be more generally suited to map display.
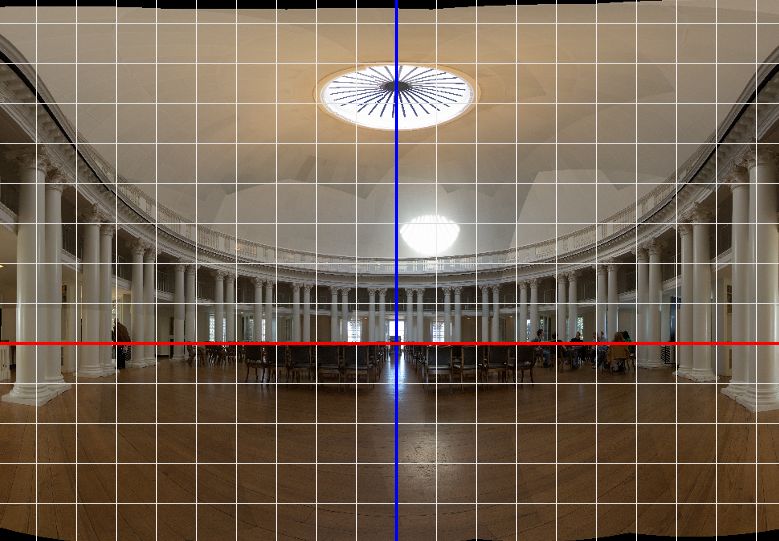
Rectilindrical Projection, 200 degree FOV (yaw,pitch factors=0,0)
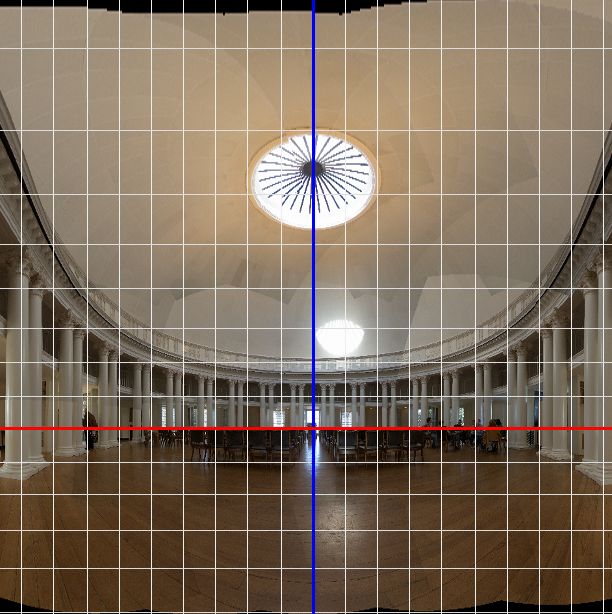
Rectilindrical Projection, 200 degree FOV (yaw,pitch factors=0,0.46)
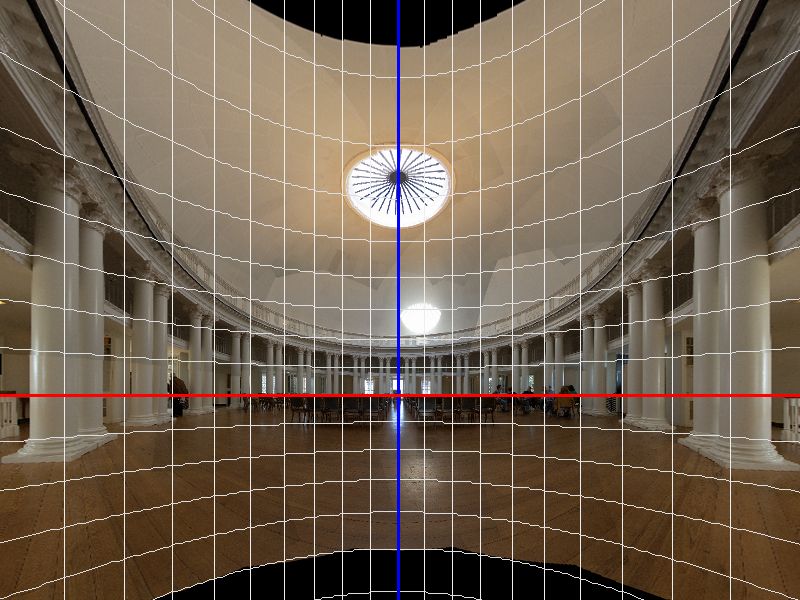
Rectilindrical Projection, 200 degree FOV (yaw,pitch factors=0.31,0.46)
In the transition area between the rectilinear and cylindrical regions, this projection is a combination of the two. The point at which the transition from rectilinear to cylindrical begins as well as the width of the transition region can both be specified by the user.
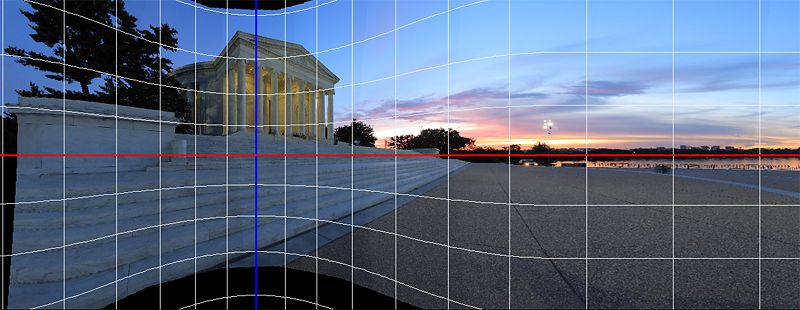
Recti-Cylindrical Projection, approx 155 degree FOV.
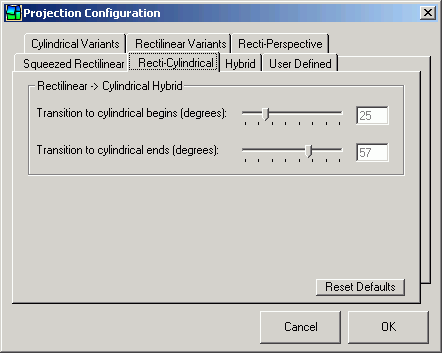
PTAssembler Recti-Cylindrical Projection Configuration dialog
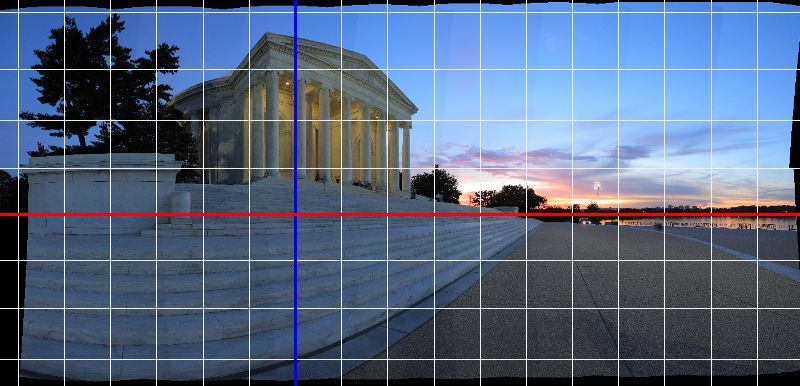
Mercator Projection, approx 160 degree FOV.
User defined projection allows the user to specify an arbitrary set of projection equations. This is intended for advanced users only. Those with a fear or aversion to math probably won't enjoy this too much and may want to avoid this projection!
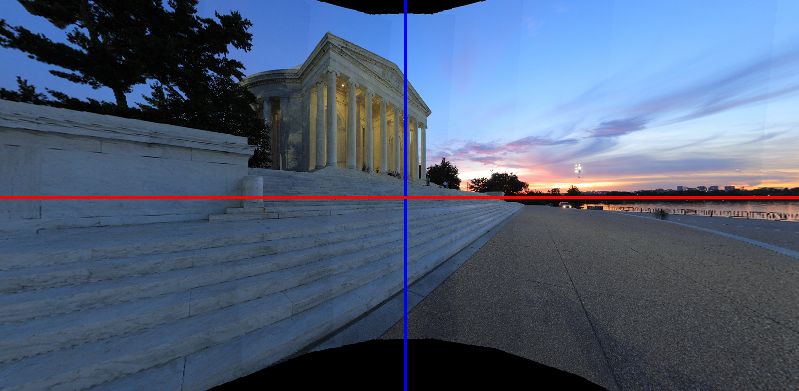
User Defined Projection, approx 150 degree FOV.
The image above was created with a user defined projection...a slight modification of the standard rectilinear projection:
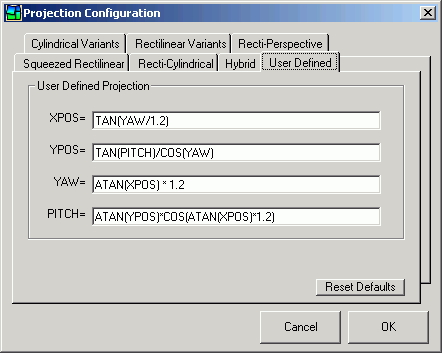
PTAssembler User Defined Projection Configuration dialog
A user defined projection is specified in two pairs of equations. The first set of equations specifies how to derive the x and y positions (XPOS and YPOS variables in this dialog) on a 2 dimensional surface from yaw and pitch (YAW and PITCH variables in this dialog). In cartographers' terms, yaw is called longitude and pitch is called latitude. The second set of equations specifies the inverse mapping, i.e. how to calculate the yaw and pitch from x and y positions.
The formulas that specify the x and y positions must be expressed as functions of yaw and/or pitch. Conversely, the formulas that specify the yaw and pitch must be functions of x and/or y.
The simplest possible projection is equirectangular. This can be specified as follows:
XPOS  = YAW
YPOS  = PITCH
YAW   = XPOS
PITCH = YPOS
A slightly more complicated projection is cylindrical:
XPOS  = YAW
YPOS  = TAN(PITCH)
YAW   = XPOS
PITCH = ATAN(YPOS)
The Mathworld page on map projections is an excellent resource for formulas for many more projections.
Using standard math operators (+, -, /, *, \, ^), trig functions (sin, cos, tan, asin, acos, atan, sinh, asinh, cosh, acosh, tanh, atanh) and other functions (abs, ln, exp, sqrt), an unlimited number of projections can be created.
The following caveats apply:
- There is no error checking on the formulas you specify. If they are not mathematically correct (e.g. missing parentheses, syntactically incorrect) unexpected results will occur. It is up to the user to ensure that the formulas are correct.
- User defined projections are slower than the other projections in PTAssembler. Images created with a user defined projection generally take longer to process.
- The two pairs of equations must be inverses of each other. If not, the user defined projection will not work correctly.
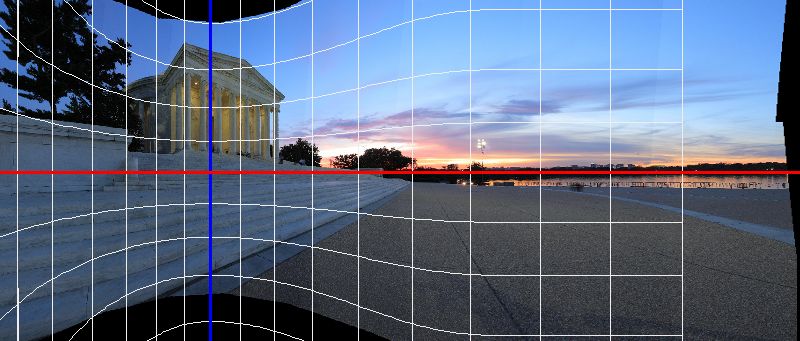
Hybrid Projection (left=User Defined, right=Recti-Cylindrical), approx 160 degree FOV.
A larger version of this image is on display in my image gallery.
PTAssembler's projection configuration dialog is used to determine which projection is used for each quadrant of the image. The green check-mark indicates that the projections are compatible at the boundaries between quadrants (not all projections are compatible with each other), ensuring that there are no disjointed transitions as a result of image projections that are not compatible.
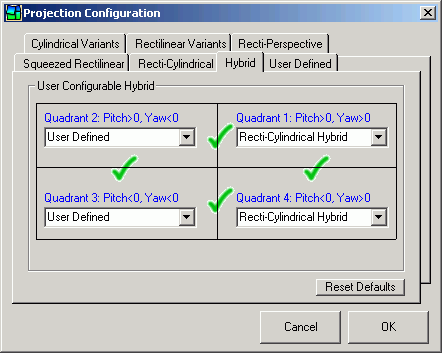
PTAssembler Hybrid Projection Configuration dialog