- Introduction
- Download Sample Project
- Setup
- Conceptual Overview
- Taking the Pictures
- Importing the Images
- Setting Lens and Project Variables
- Setting Control Points
- Setting the reference point
- A Note about Yaw, pitch and Roll
- Optimizing the Project
- Preview and Create
- Finishing the Image
- Conclusion
Introduction. This tutorial explains how to create a stitched image using PTAssembler. PTAssembler is a "helper program" that works with Panorama Tools to stitch images together into panoramas and high resolution mosaics. There are many programs that can stitch images together, but PTAssembler allows much more manual interaction than most...and can be used to create extremely high resolution images of unsurpassed quality by stitching in two dimensions (both vertically and horizontally).

4 source images (arranged in a 2x2 grid), before and after stitching
In this tutorial, I'll show how to create a mosaic of four images, arranged in a 2x2 grid. Once you've mastered this, it is easy to change the number of images and arrangement to 3x3, 4x1 or any other variation. This tutorial is aimed at beginners, and skips over as much "advanced" material as possible. The goal is to illustrate how to create a stitched image with as little difficulty as possible.
Download Sample Project. You can download a sample PTAssembler project and images that can be used to to create the mosaic in this tutorial. In order to keep the download to a reasonable size, the images in the sample are smaller versions of the ones used in this project. After downloading the sample, unzip the image files and project file to a directory. you should be able to load the project in PTAssembler and create a final image by pressing the "create" button on the Step 5 screen.
Setup. Before you do anything, you should make sure that you have PTAssembler and Panorama Tools installed correctly. The readme document that comes with PTAssembler gives instructions on what files you need, where to find them and how to install them. Briefly, you'll need to download and install Panorama Tools and then PTAssembler (version 2.1 or later). (Note: This tutorial was created using version 2.1 of PTAssembler. Future versions may appear slightly different).
Once you've installed both programs, you should review (and modify if needed) the settings on the "Files/Directories" tab of PTAssembler's preferences screen.
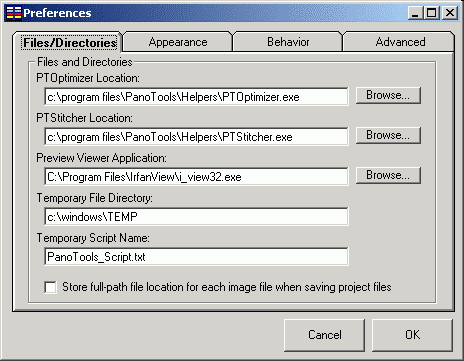
PTAssembler needs to know were to find important files
In this example, you can see that I've placed the PTOptimizer.exe and PTStitcher.exe files that are distributed with Panorama Tools in a directory called "c:\program files\PanoTools\Helpers\". I am using Irfanview ("C:\program files\IrfanView\i_view32.exe") as my preview viewer. Any temporary files that are created by PTAssembler will be placed in the "c:\windows\temp" directory and temporary scripts written by PTAssembler will be called "PanoTools_Script.txt". You may need to adjust these settings if you have placed your files in different locations.
Conceptual Overview. Before starting on the details, it is good to have an overview of how to create a stitched image using PTAssembler. The process can be broken down into several steps as follows:
- Take the images
- Load images into a new PTAssembler project
- Enter some parameters that describe your lens and images
- Set control points to identify items in overlapping regions between images
- Choose a reference point
- "Optimize" the project to determine the best alignment of images
- Create a final output image using the "optimized" project
- Perform final image blending and seam placement (optional)
Now, on to the details...
Taking the Pictures. The first step to creating a stitched image is to take a sequence of overlapping images. Preferably, you should use a tripod to take your images so that the camera does not move (except for rotating) between images. You may be able to stitch an image taken without using a tripod but chances are good it will make your life considerably more difficult. Ideally, you should use a tripod with a special "panoramic head" when taking your images. However, as long as your subject doesn't contain a lot of objects close to the camera, you probably don't need a panoramic head. For this reason, it is probably best not to try and start with a panorama of the inside of your house!
The four images in this project are arranged in two rows of two images. As you can see, the images overlap slightly. This is necessary so that PTAssembler can determine how to align them correctly. An overlap of about 10-20% is usually sufficient to ensure a good result. More overlap doesn't hurt, but is really just "wasted pixels".
It doesn't matter if the images are taken with a digital or film camera. It is best that you take the images using the same exposure (and whitebalance for digital cameras). You may need to set your camera in manual mode to make sure that the aperture and shutter speed are the same for all images in your project. If the shutter speed, aperture or whitebalance vary between images, then there will be obvious changes of color and/or brightness between images. This can be corrected later, but will make things much more time consuming, and difficult. PTAssembler can work with JPEG, BMP and/or TIFF images.
Importing the Images (Step 1 screen). Once your images are captured, add them to a new project (Choose 'File|Add Images...' or drag-and-drop images onto PTAssembler's Step 1 screen).
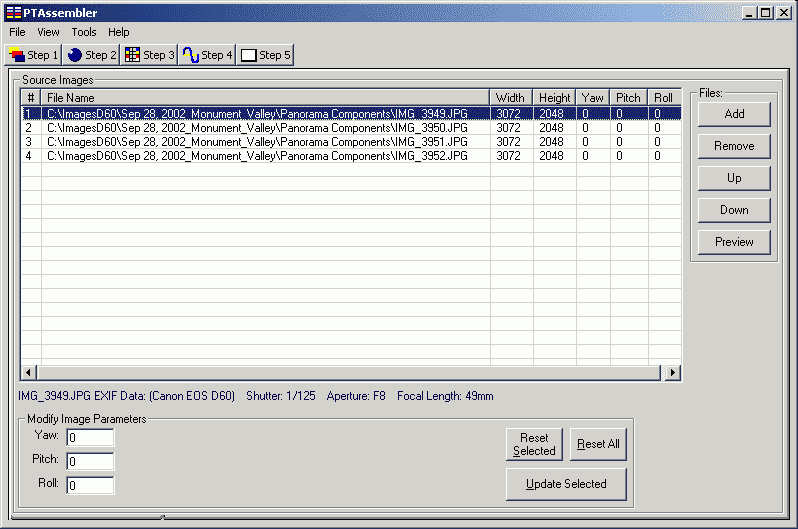
4 images loaded into PTAssembler
As you add images to the project, PTAssembler will add the names and dimensions to the source images table. Images are added in alphabetical order, but can be reordered using the up/down buttons. To view one of your images, click on the preview button. PTAssembler does not have a built-in image viewer, but will launch your preview viewer program (defined on the preferences screen) to show the image. I recommend using a freeware program like Irfanview as your preview viewer, but you may also be able to use a web browser like Internet Explorer or Netscape.
There are other controls and fields on this screen, but they can be happily ignored for now.
Setting Lens and Project Variables (Step 2 screen). The next step is to tell PTAssembler about the lens you used when taking your images.
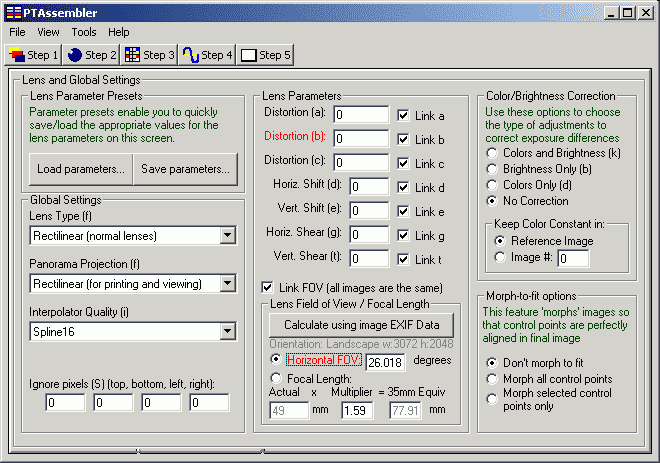
Only a few of these fields need to be modified
Although the step 2 screen has a lot of fields and buttons, only a few are really important for beginners:
- Horizontal FOV. The horizontal field of
view (FOV) field is the most important field on this screen. If you don't get this
correct (or nearly correct), it is very unlikely your project will work.
If you know the FOV for your lens...great! Enter it in the horizontal FOV field
and move on to the next step. If (like most people), you don't know the FOV
of your lens PTAssembler can compute it based on the focal length of your lens.
The simplest case is if you use a 35mm camera. Let's say that you used a 35mm camera with a 50mm lens. In this case, you should enter the value of 50 into the "Actual" field, and a value of 1 in the " multiplier" field. PTAssembler will compute the FOV for your lens automatically.
If you are using a digital camera, PTAssembler may be able to determine the focal length of your image by reading the EXIF data out of your image. (Note: EXIF data is information that is stored inside an image. It can be read by programs like PTAssembler that understand how to access and decode the data...it is not visible by looking at the image). If PTAssembler finds EXIF data in your image, you will see a button called "Calculate using image EXIF data" on the Step 2 screen. Click this button and if PTAssembler finds focal length information in the EXIF data (not all digital camera images contain focal length information), then it will populate the "Actual" field and compute FOV.
However, because most digital cameras have small sensors and short focal lengths, you may need to enter a multiplier value to convert the actual focal length reported by your camera to its "35mm equivalent" value. A few cameras (such as the Canon D60) contain enough EXIF data for PTAssembler to compute the multiplier. The images in this example were taken with a Canon D60 and (as you can see in the image above) PTAssembler has determined from the EXIF data that the actual focal length was 49mm, and the multiplier is 1.59. Based on this, it has computed a "35mm equivalent" focal length of 77.9mm and a FOV of 26 degrees.
But what if your images don't contain the appropriate multiplier? You'll have to compute it for yourself.
Let's say, for example, that you are using a camera like the popular Canon s45. The review of the Canon s45 on DPReview says that it has a 35mm-105mm zoom lens. But this is marketing terminology...In reality (as you can see by looking at the writing on the front of the lens itself) the camera has a 7.1-21.3mm zoom lens. The 35-105 figure is a "35mm equivalent" measure. Most digital cameras are marketed this way. Consumers who are familiar with 35mm cameras know (more or less) what to expect from a 35-105mm lens. And to those who are familiar with 35mm cameras, a 7.1-21.3mm lens sounds suspiciously like a ultra wideangle or fisheye lens...probably not something the average consumer thinks he wants. So, manufacturers typically talk about a 3x zoom (which tells you nothing about focal length and field-of-view) or use the "35mm equivalent" value when describing digital camera lenses.
So, how do you compute the appropriate multiplier for this camera? Easy...simply figure out what value (i.e. multiplier) the manufacturer used to convert 7.1-21.3 into 35-105. For the Canon s45, the answer is 4.93. - Distortion (b). Most lenses suffer from some degree of pincushion or barrel distortion. Some people recommend determining the amount of distortion in your lens and entering the appropriate value in this field. However, as long as you set enough control points on the Step 3 screen, then you can happily leave this to its default value, and have the optimizer compute this value on the Step 4 screen.
- Lens Type(f). You should tell PTAssembler what kind of lens you use. If you aren't sure, then you almost certainly used a Rectilinear lens...the "standard" camera lens.
- Panorama Projection(f). This determines how your final image should be projected. Rectilinear projection will guarantee that straight lines in your images will be displayed as straight in the output image. However, if your image covers a wide field of view, then the edges may start to look "stretched". It is also mathematically impossible to produce a rectilinear image that covers more than a 180 degree field of view, so if you've taken a lot of images in one row, you should probably choose cylindrical projection.
Setting Control Points (Step 3 screen). Setting control points is a little time consuming but well worth the effort. Panorama Tools uses these control points to "learn" how your images are supposed to align. The more accurately you specify your control points, the better the results. A control point identifies an element that appears in the overlap region between images. Anything can be used as a control point as long as it can be identified in two images.
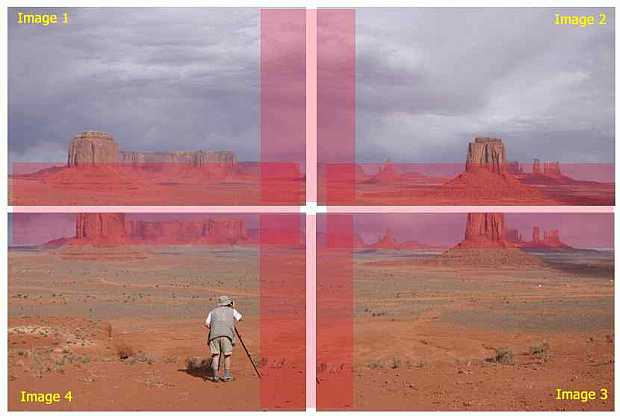
Control points should be placed in all overlapping regions (marked in red)
Control points should be placed wherever images overlap. In this project there are four overlapping regions (between images 1 and 2, 3 and 4, 1 and 4, 2 and 3) as marked in red. In each overlapping region, you should aim to place 5 or 6 control points. More control points can help the optimizer in some cases, but is usually not necessary. Fewer control points may cause the optimizer to incorrectly guess how the images should be aligned. Although not always possible, you should try to place control points evenly along the length of each overlapping region.
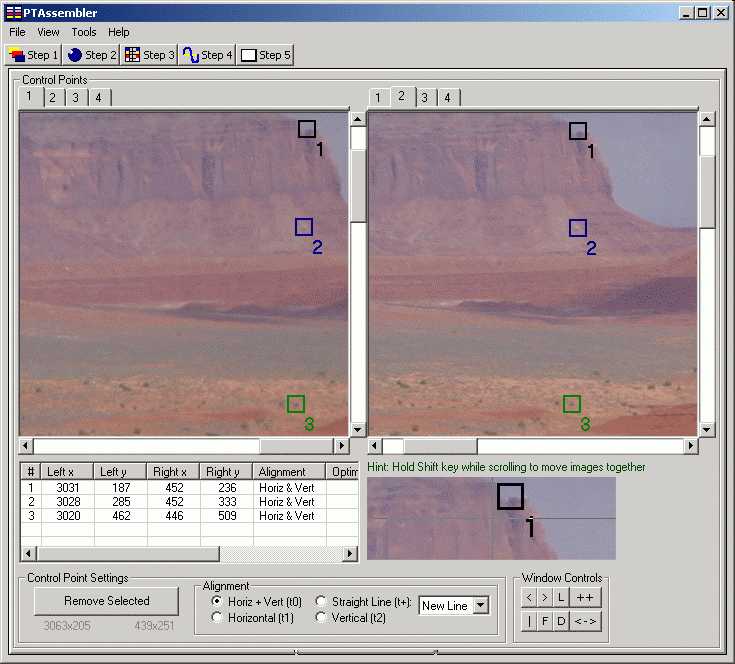
Clicking on the images creates control points
To create a control point, click once in the left image and then once in the right image...A control point marker will be placed on the images. To delete a control point you can right click on the marker and choose delete.
For advanced users, there are other options on this screen, but these are usually not needed for beginners.
Setting a Reference Point (Step 4 screen). Once you've got all your control points in place, the next task is to set a "reference point". The "reference point" for any mosaic or panorama is the point in the scene that is straight ahead at eye level when you take the images. This point is used by PTAssembler to determine the Yaw, Pitch and Roll value for the image that contains it.
The reference point is the point that you saw when you looked straight ahead when you were taking the images in this project. If the camera was level (i.e. not pointing up or down) when the images were taken, the reference point should be (as close as possible to) the desired center of the final panorama. If the camera was pointing upwards (e.g. from street level towards the top of a building) then the reference point will be in the bottom half of the image, near the ground floor of the building. Conversely, if the camera was pointed down (e.g. from the top of a mountain down into a valley) to take the images, then the reference point will be near the top of the image.
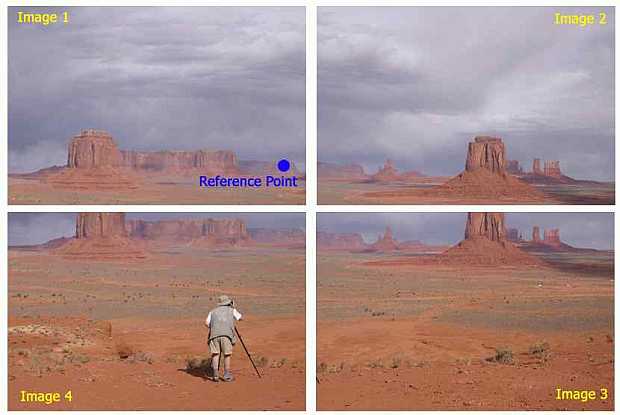
The reference point is straight ahead, at eye-level
In this example, the reference point could have been chosen in any one of the four images because it happens to appear on a feature that is visible in all images...a butte on the other side of the valley. For this example, however, I've placed it in image #1. To set the reference point, first click on the appropriate image (Image #1) in the box titled "Ref Image/Point" on the step 4 screen. Next, click on the button titled "Set Reference Point" to bring up the reference image (image #1) in the reference point picker screen. Here is where you set the reference point. Once you've clicked on the image, red and blue intersecting lines are drawn to indicate the position of the reference point.
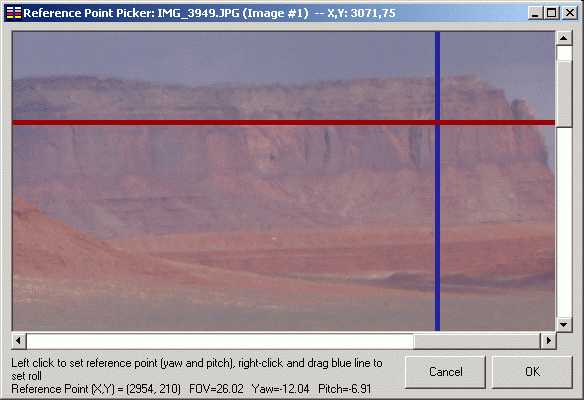
Click on the image to set the reference point
Because setting the reference point is so important, here are a couple of other examples to illustrate the concept. In this project (Lincoln Memorial in Washington, DC), the images were taken from ground level. Thus, the reference point appears towards the bottom of the project, straight ahead from the camera.
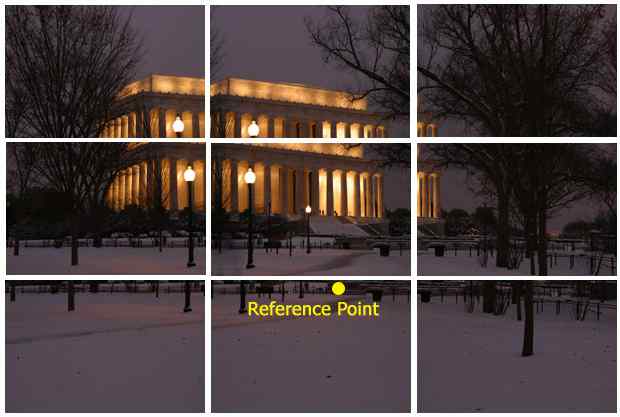
Camera was at ground level...reference point is straight ahead, at eye-level
In this next example (Escalante National Monument in Utah), the camera was on top of a cliff overlooking the landscape. Thus, the reference point (straight ahead at eye-level) is in the distance on the next mountain range.
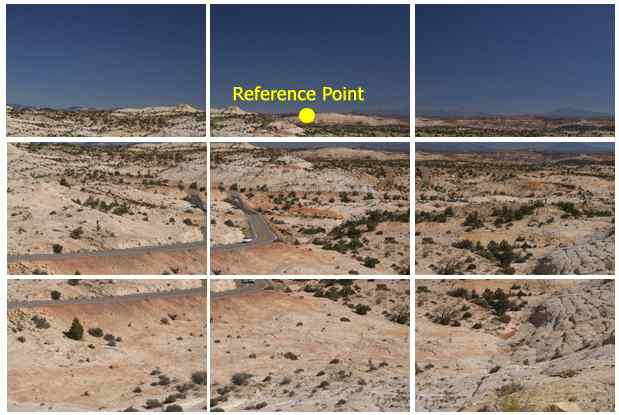
Camera was elevated...reference point is straight ahead, at eye-level
Setting the reference point incorrectly can result in the panorama being off-center, or vertical lines appearing to converge or diverge in the final panorama. You may need to experiment to find the exact location of the reference point, but you can always come back to this screen and adjust your choice later.
A Note about Yaw, Pitch and Roll. The optimizer (accessed on the Step 4 screen in PTAssembler) uses the control points you set on the Step 3 screen, to determine the best alignment of your source images. The optimizer does this by determining the yaw, pitch and roll for each source image in your project. Once these values are computed by the optimizer, Panorama Tools will know how to warp and align the input images so that they can be stitched into a final output image.
Before going further, a short explanation of yaw, pitch and roll might be helpful. "Yaw" is the left-to-right angle of the camera. "Pitch" is the up-and-down angle of the camera. "Roll" is the rotation angle about the lens axis...if the roll of your camera is not zero, then the horizon will appear "tilted".

Yaw, Pitch and Roll
Optimizing the Project (Step 4 screen). Once you've set your control points and picked a reference point, you can run the optimizer. For beginners, the best way to run the optimizer is by clicking the "Auto-Optimize" button. PTAssembler will automatically decide which images and variables to optimize, and will run the optimizer several times in rapid succession (this is because the optimizer generates the most reliable results when run incrementally, rather than when attempting to optimize every variable for every image in one run). In addition to optimizing the values for yaw, pitch and roll, the Auto-optimizer will estimate the "b" lens parameter to try and correct any pincushion or barrel distortion in the input images.
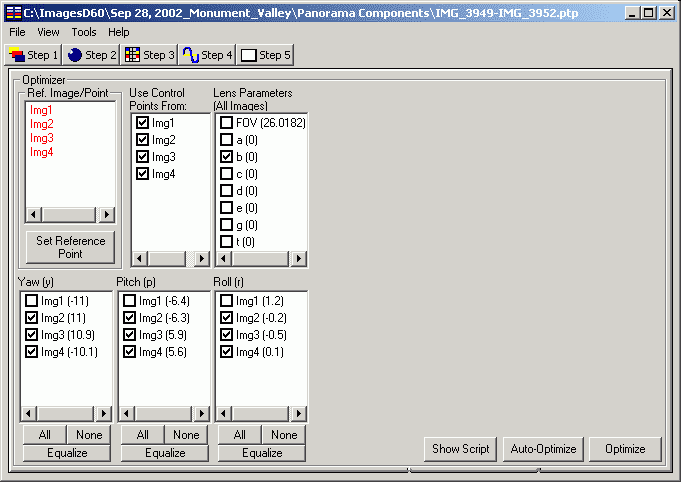
Click the "Auto-Optimize" button to launch the optimizer
While the optimizer is running you'll see a screen showing the "average distance between control points". The lower this number is, the better your images can be aligned. Once the optimizer has finished, PTAssembler displays a screen showing the results of the optimizer, and the final value for Average Control Point Distance (APCD). PTAssembler also displays some other information and (depending on the results) may provide some hints, such as suggesting whether the reference point may be misplaced.

Results screen after running optimizer
In this example, the ACPD is 1.792, which is quite low. PTAssembler has presented a suggestion that perhaps the reference point is misplaced. You may want to keep this in mind, if the final image does not appear correct, but it can be ignored for now. This screen also reports that the control point with the worst optimized distance is in the overlap region between images 1 and 2, and has a value of 4.9 pixels. This is not great, but can usually be resolved by careful placement of the seams in the final image.
Lastly, PTAssembler will ask you if you want to create a preview panorama. Assuming all went well with the optimizer and PTAssembler reports that the ACPD is low, you should create a preview. If PTAssembler reports that the ACPD is not low, then you should go back to see why the optimizer failed. Some common causes of problems are the following:
- Incorrectly set control point(s). Does one of your control points have a much larger optimized distance than all the others? Perhaps you clicked in the wrong place. (Hint: You can view a table listing the optimized distances for all your control points by using the "View|Show all control points" menu item.)
- Not enough control points. Try adding a few more control points in the overlap regions.
- Control points not spaced evenly. Ideally, the control points should be spaced more-or-less evenly along the length of the overlap regions.
- Images not taken using a tripod (camera moved between images). There's not too much you can do about this except start with new images.
- Too many foreground objects/parallax errors. You could try only specifying control points on distant objects, but you might be better off starting with new images here as well.
You can run the optimizer any number of times. However, the optimized distance won't change much after the first run, unless you change some of the project parameters. If you want a more "hands-on" approach, you can optimize your project manually by checking the images and parameters that you want to optimize and by clicking the "optimize" button. This approach may take longer, but allows for more control than the "Auto-Optimize" button.
After the optimizer has been run, you can see the values that have been computed for your project by looking at the numbers in parentheses on the Step 4 screen, or by switching back and looking at the image list on the Step 1 screen. In the example, we can see that the optimizer has computed a Yaw for image 1 as -11 degrees. This means that Panorama Tools has computed that the camera was rotated 11 degrees to the left (relative to the reference point) when this image was taken. Similarly, the yaw for image 2 is +11 degrees, indicating that the camera was rotated 11 degrees to the right when taking this image. The pitch values for images 1 and 2 show that the camera was tilted up by 6.4 and 6.3 degrees (negative values indicate pitch upwards), and down by 5.9 and 5.6 degrees for images 3 and 4.
Preview and Create (Step 5 screen). At last...time to create a panorama! First, click on the "Auto Size Parameters" button to automatically determine reasonable values for the Horizontal FOV, and width and height boxes. (You may want to adjust these later). If you haven't done it yet, you should click on the "Preview" button to create a small scale preview panorama. PTAssembler will display it using the "preview viewer" program (specified on the preferences screen). A preview panorama is useful for testing whether your optimized parameters produce a reasonable looking panorama before making a full-sized output image. By default, PTAssembler will create a panorama with "black space" at the left and right edges. You can crop this space away after the image has been output.
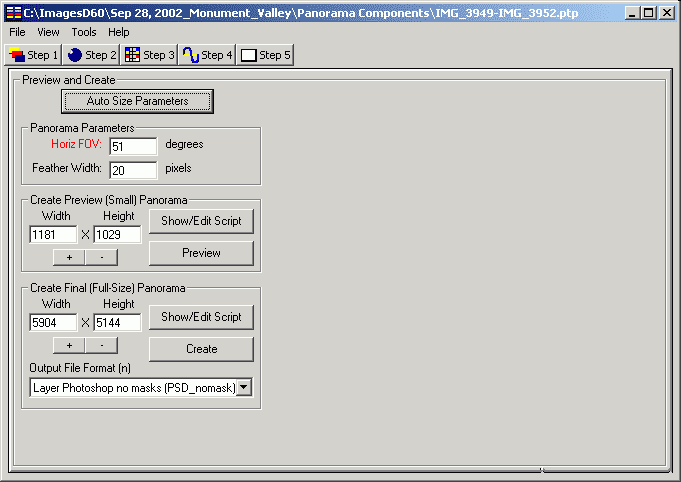
Click the Create button to create the final image
If you are satisfied with the preview panorama, then you can create a full-sized version. Before doing so, you should select whether to output a layered (e.g. Photoshop PSD) or non-layered (e.g. JPEG, TIFF) file format. This is an important decision. If you create a non-layered image, PTAssembler will create an output image and your image will be finished. Easy enough...but your options for correcting any remaining minor misalignments, lighting changes, etc. are pretty limited.
If, on the other hand, you decide to output a layered image, then this can be edited in an image editor that works with layered files (such as Photoshop, the Gimp, Paint Shop Pro, etc.). Note: If your image editor can open Photoshop PSD files, then I'd recommend using the "Layer Photoshop no masks" output format. This will produce one output file with as many layers as there are input images (4 layers in this example). If your editor cannot open the PSD format, then I'd recommend using the "Multiple img TIFF" format. This will output one file for each layer (4 files in this example), which can then be imported into your editing program and manually combined to create a layered image.
Once you have chosen the output file format, click the "Create" button to start the stitching process. You will be prompted to specify where the final image should be saved, and then Panorama Tools starts stitching the images. This may take several minutes depending on the size and number of input images, and the speed of your computer. Once the process has finished you can view the result in your favorite image viewer (PTAssembler does not display the final panorama).
If you have created a non-layered output image, then you are finished. The final image has been created. If you chose to output a layered image then keep reading for instructions on how to finish the image.
Finishing the Image - Seam Placement. For the remainder of this tutorial, I use Photoshop 5 Limited Edition to finish the image. You can use a more recent version of Photoshop or any other image editing program (perhaps with minor differences) to achieve the results shown here.
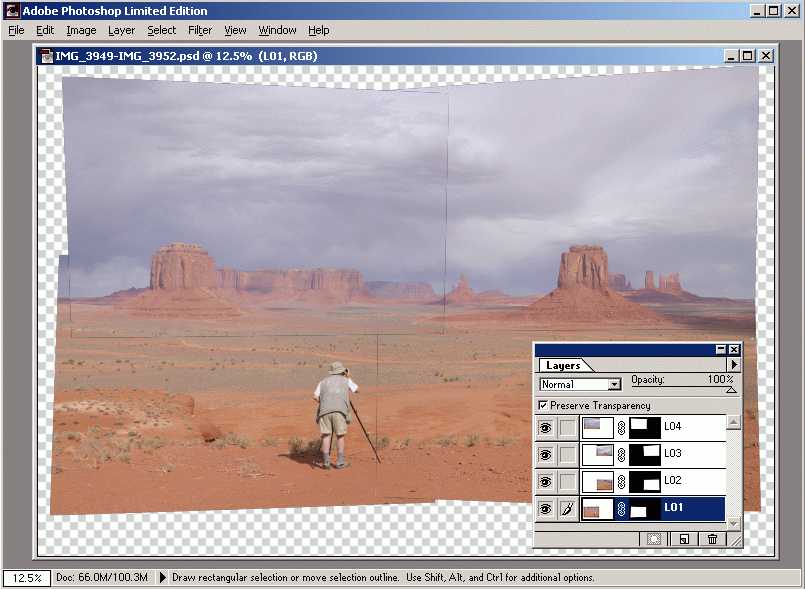
Layered image output by PTAssembler, imported into Photoshop
There are undoubtedly numerous ways of converting the layered output into a final image using an editor like Photoshop. My procedure is described below, but you should experiment to find a method that works best for you. The basic idea is to create invisible seams in the overlap region, touch-up any minor brightness and/or color differences, and then flatten the result into a final image.
After opening the image into Photoshop, the edges of the image are usually still visible. The goal is to place the seams so that they are not apparent. First, duplicate each layer in the image and then delete the original layer (without this step, deleting a selection does not reveal the layer underneath correctly....I'm not sure why!) Next, for each layer in the file, set the blending mode to "difference" and the overlap region turns mostly black. Wherever pixels in the overlap region between layers are identical (i.e. the images are correctly aligned), the overlap region will be black. Although this step isn't strictly necessary, it makes it easy to identify areas of the overlap region where the seam will not be noticed. Lastly, use one of Photoshop's selection tools (in this case I've used the "Polygon Lasso tool") to draw a seam and select an area to be deleted.
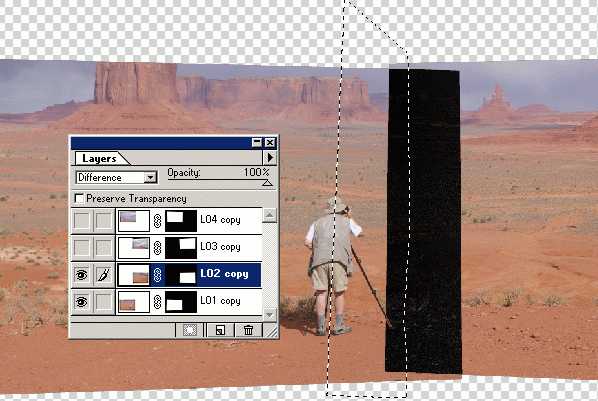
Placing the seam so misalignments aren't visible
After deleting the selected area and setting the blending mode back to normal, there should be no evidence of where the seam lies.
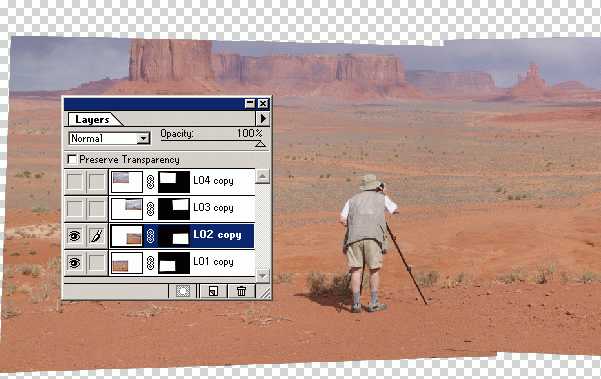
Delete selected area and change blending back to normal
Finishing the Image - Color/Brightness Adjustments.
After repeating the seam placement process for each overlap region, you may see slight differences in light intensity between images, or you may see a slight shift in colors where one image meets the next. These lighting/color changes can be due to light falloff in your camera lens, or a change in the lighting of the scene between images. In any case, the solution is to manually adjust the color/brightness of each layer. In this example, after seam placement, there is one area in the sky where a slight seam is evident, because the clouds moved between images. It is subtle enough that it could be ignored, but a couple of seconds with the clone tool is enough to touch up the seam.
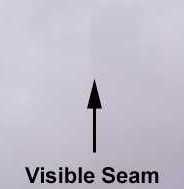

Residual seam before and after "touching up"
As with all things in Photoshop, there are numerous tools at your disposal to touch up image differences such as these...the clone tool is often useful, as is the eraser tool, the airbrush tool, and in some cases the levels tool can be used to change the levels of each color channel to balance images with slight color changes.
Finishing the Image - Flattening. The last step in the process is to flatten the layers of the image into one final image, crop the image as desired, and save the resulting file. In this example, I've also made a few adjustments to increase contrast and enhance the sky a little. You may also wish to add some sharpening, but this is a matter of personal taste.

The final product (a 20+ megapixel digital image)
Conclusion. The final image shown here consists of 4 images, but the procedure can be easily extended to include 9, 15, 20 or any number of images. The more images that are used, the longer the procedure takes, but the results are worth the effort. This example created an image with about 20 megapixels (4 images of 6 megapixels each, minus a few megapixels that are "lost" in the overlap regions). This image will produce an excellent print at sizes up to 30x20 inches. Mosaics and panoramas with more images can be printed at even larger sizes and still appear sharp under close inspection.
This tutorial has skipped over a lot of the capabilities and features available in PTAssembler and Panorama Tools. There are numerous refinements that can be made to the procedure outlined here, and I encourage you to read the documentation that is included with PTAssembler for more information about how to use the program.
For some more examples of my own high-resolution mosaic and stitched images, please visit my on-line image gallery.
-- Max Lyons
-- February 2003 (Revision 1.1)