- Introduction
- Conceptual Overview
- Quick Start Tutorial
- Main Screen
- Image Window
- Close-up Window
- Image Properties Panel
- Star-trail Settings Panel
- Optimize/Create Buttons
- Status and Information Panels
- Options Screen
- Advanced Settings Screen
- Output Screen
- Menu Options
- Tips and Tricks
- Bugs and Problems
- Downloads
- Purchasing a License and Registering Star Tracer
- Links and More Reading
Star Tracer is a windows program that can be used to improve and enhance "star-trail" photographs. Its two main functions are:
- Filling in the "gaps" in star-trails that result when stacking multiple images together to create a single star-trail image.
- Extending the length of star-trails.
Star Tracer works by calculating the path of the stars, and then using that information to either fill in the gaps and/or extend the length of star-trails. Conceptual Overview
Conceptually, there are two main steps in using Star Tracer. The first main step is providing enough information to Star Tracer so that it can determine the path of the stars. This is done by "drawing" several "star lines" on the image. These lines tell Star Tracer about the paths followed by individual stars in your image. Star Tracer uses this information to "optimize" the project...determining the trajectory of all the stars in the image. Even short star-trails (e.g. 60 seconds) contain enough information for Star Tracer to determine the trajectory that the stars will take over the course of several hours.
The second main step is creating the output image. Once the project has been optimized, Star Tracer can "rotate" the image by any amount and any number of times requested. You can choose to output the result as a single image, a series of images or a multi-layer Photoshop file. In fact, the image transformation is much more complex than a simple rotation, but for simplicity, this document refers to this transformation as rotation. Quick Start Tutorial
This section provides a very quick tutorial showing how to use Star Tracer. This is not the only way to use Star Tracer but shows a general approach that should work well under many circumstances.
- Open a TIFF or JPEG image in Star Tracer using the File|Open menu item. The image should have several visible star trails, either as a result of using a long exposure or having stacked a number of shorter exposure images into a single composite. The image should be displayed on Star Tracer's main screen.
- Draw at least 20 "Star Lines" (the more the better) on the image using the mouse. (Press the left button to start a line, drag the mouse and release the button to complete the line.) Each star line should lie exactly on top of a star trail.
- Enter the field of view for your image in the Image Properties Panel. If you need to calculate this value, you can do so using an online calculator like this one.
- Set the Lens Projection type in the Image Properties Panel as appropriate for your lens. (If you don't know the answer, it is very likely that the lens type is rectilinear or perhaps one of the two fisheye settings).
- Set all other image properties in the Image Properties Panel and the Advanced Settings Screen to zero. Make sure the checkboxes next to pitch and roll are checked, but all others unchecked.
- Press the Optimize Button. The optimizer will estimate values for pitch and roll based on your inputs (star lines, lens type, field of view).
- Choose how much you want to rotate the image (in seconds), and how many rotations to preform using the Star-trail Settings Panel. If you aren't sure, try a test image using one rotation and a small time amount (e.g. 5 minutes or 300 seconds). Your artistic/creative goals determine the "correct" values at this stage.
- Press the Create Button to show the Output Screen and create the final result.
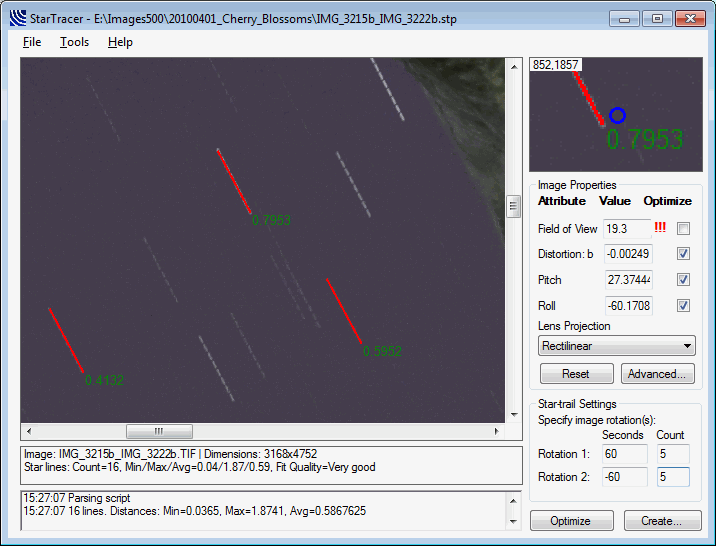
Star Tracer Main Screen
The main screen of Star Tracer is where almost all interaction with the program occurs. It allows you to load an image, tell the program about the image, optimize the project and initiate the creation of an output file. The main screen contains several regions (listed clockwise from top-left):
- Image Window
- Close-up Window
- Image Properties panel
- Star-trail settings panel
- Optimize/Create buttons
- Status and information panels
Each Star Tracer project contains one image, which is displayed in the image window. The first step in creating any project is to add an image (using the File -> Open Image menu item, or dragging-and-dropping an image onto the image window). Star Tracer can handle JPEG and/or TIFF files. (TIFF files can be 8 or 16 bits per channel with either 3 or 4 channels.)
After loading an image, you should draw several "star lines" on top of the image using the mouse. These lines are what tell Star Tracer the direction that the stars follow in your image. Click and hold the left mouse button to start a line, move the mouse, and then release the button to end the line. The star line is shown in red on top of the image. The start and end point of each star line should lie on top of a star-trail in the image.
To delete a line, hold the keyboard ctrl key down, and drag the mouse while pressing the left mouse button. A rectangular region is drawn on the screen and when the left mouse button is released, and star lines within that region are deleted.
After the project has been optimized, a number is displayed next to each star lines. This number is a measure of "fit"...how close each star line drawn on the image matches Star Tracer's estimate of the trajectory of the underlying star. Lower values are better than higher values, and values under 1 are excellent. If there are many lines with large values (i.e. 3 or higher), chances are good that one or more of the star lines have been drawn incorrectly, the FOV is specified incorrectly, and/or the optimizer has converged upon an incorrect solution. The solution to any of these problems is to check that all star lines have been drawn correctly, add more star lines, reset the image parameters and optimize again. Close-up Window
As you move the cursor around the image, a magnified version of the region underneath the cursor is displayed in the close-up window. This can be helpful for accurate placement of the star lines. Image Properties Panel
The image properties panel shows the essential pieces of information needed for any Star Tracer project. Together, these parameters are what Star Tracer uses to determine the correct trajectory of the stars.
- Field of view is the horizontal (i.e. left to right) field of view (FOV) of your image. Most images from modern digital cameras contain enough information for Star Tracer to be able to deduce the FOV. However, if not, then you can enter it manually. It can be calculated quite easily using a field-of-view calculator like the one on this page. The optimizer can also deduce this value in many cases, although this is not always reliable, and often requires the addition of many more star-lines in order to generate a reasonable estimate. If possible, it is preferable to calculate and enter this value rather than asking the optimizer to estimate it.
- Distortion b. In general most lenses exhibit some kind of distortion (i.e. deviation from a theoretically perfect lens). It is necessary to account for this distortion so that Star Tracer can correctly compute the trajectory of the stars. In most cases, the distortion can be adequately characterized using one parameter ("b"), and the optimizer can deduce the value for that parameter based on the star-lines you create. If you already know this value (e.g. you calculated it in another project), you can enter the value, otherwise you can let the optimizer derive it.
- Pitch and Roll. Together these two values tell Star Tracer about the relationship between the camera position (and orientation) and the celestial sphere upon which the stars appear to travel. The main goal of the optimizer is to deduce these values based on the star-lines that you create.
- Lens Projection. This tells Star Tracer about the type of lens used to create the image. If you are uncertain of the lens projection, rectilinear will almost certainly be the correct choice, as almost all camera lenses (excluding fisheye lenses) use rectilinear projection. Star Tracer also supports other projections that can be generated by panoramic stitching software like PTAssembler .
Next to all of text fields are checkboxes. If checked, the optimizer will attempt to estimate appropriate values for these parameters. In general, all projects will need to have pitch and roll optimized. Unless you are certain that your image has no lens distortion (e.g. you have already corrected it using other software), then it is usually beneficial to have the optimizer calculate a value for the "distortion b" parameter.
If you do not know the FOV of your lens, and cannot enter it manually, then you can ask the optimizer to estimate FOV. Note, however, that this can be unreliable, and the optimizer may sometimes calculate values that aren't correct. Adding more star lines to the project may help the optimizer find a more reasonable value.
The reset button resets the image properties to their default values. This can be useful if the optimized results aren't correct, and you need to change some values and/or star-lines before optimizing again. Because the initial parameter values influence the results calculated by the optimizer, it is often beneficial to reset all values prior to optimizing.
The advanced button shows the advanced settings screen where you can choose to enter and (configure optimization of) several other less frequently used image properties. Star Trail Settings Panel
This panel allows you to control the final output. You can configure the amount by which to "rotate" the image, and the number of times to perform this rotation. Rotation amounts are expressed in seconds, and control the distance by which stars appear to move across the sky. Because the earth rotates 360 degrees in 24 hours (86,400 seconds), one second corresponds to 0.00417 degrees of rotation.
The panel allows you to specify one or two different rotations simultaneously. If you only wish to rotate in one direction then only one rotation need be specified. Note that the entire image is rotated by Star Tracer, not just the stars. Note that other objects (e.g. trees, buildings, etc.) will also be rotated, unless they are "masked", so you may also want to add a mask to the image before rotation.
Regardless of how many rotations are specified on this panel, Star Tracer always creates one "base" output image (or layer), containing the original image without any rotation. Although not rotated, this base image (or layer) may differ from the original image if Star Tracer is configured to correct lens distortion and/or ignore masks when creating output. Optimize and Create Buttons
The optimize button invokes the optimizer which generates estimates for the selected image properties. Any properties that are checked in the image properties panel and the advanced settings screen will be estimated by the optimizer. In general, the more values that the optimizer tries to estimate, the more star lines are needed to generate reliable estimates. Similarly, if FOV is being estimated, it is recommended to add several additional star lines.
After optimization, Star Tracer analyzes the results and presents a message with suggestions and recommendations if the results appear unreasonable. Incorrectly placed star lines, incorrect specification of parameters (e.g. lens projection, FOV) and an inadequate number of star lines can cause the optimizer to produce unreliable results.
The create button starts the image creation process by displaying the output screen where you can choose the format for the output image(s). Star Tracer can either create a single "flattened" output file (in JPEG or TIFF format), a multi-layer output file (in PSD or PSB format), or multiple output files (in TIFF format). The flattened format files are composite images, created by layering multiple rotated images on top of each other, choosing the brightest pixel at each location, similar to Photoshop's "lighten" blending mode.
In all cases, regardless of the number of rotations, Star Tracer always creates one "base" image (or layer) containing the original image without any rotation. If configured on the options screen, Star Tracer can ignore any masks when creating the base image. Status and Information
Underneath the main image window are the status and information panels. These panels show information about the project and display application messages produced by Star Tracer during its operation. Options Screen
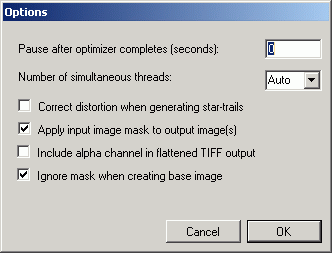
Options Screen
- Pause after optimizer completes. Specifies the number of seconds to display the optimizer screen after it completes processing.
- Number of simultaneous threads... Specifies the number of threads to use when creating the output image. Threads process in parallel, so using more threads can speed processing. However, more threads require more memory, and if too many threads are used, Star Tracer may exhaust available memory. You can also select "auto", and Star Tracer will decide by itself the appropriate number of threads.
- Correct distortion... If checked, Star Tracer will also correct (i.e. undo) the disotrion in the image when processing.
- Apply input image mask... If checked, and if the input image includes a mask, then that mask is applied to the output image as well. Note that even if unchecked, pixels that are masked in the input image are excluded from rotation/processing.
- Include alpha channel... By default, Star Tracer removes the alpha (mask) channel from flattened TIFF output. If checked, Star Tracer will retain the alpha channel in flattened TIFF output.
- Ignore mask when creating base image If checked, Star Tracer will ignore any masks when creating the base image in the ouput.
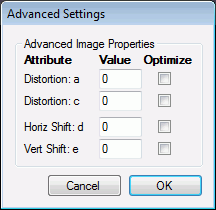
Advanced Image Settings Screen
The advanced settings screen contains additional parameters that describe the image. In general, under most circumstances these can be left at their default value of zero, and do not need to be optimized.
The "distortion a" and "distortion c" parameters are additional parameters that can be used to characterize any lens distortion. Some lenses have unusual lens distortions that may benefit from including either (or both) of these parameters in the optimization.
The Horizontal and Vertical shift parameters are useful if a lens is not centered correctly, or if the input image is a region cropped from a larger image. This is often true if the input image has been produced by a panoramic stitching program (like PTAssembler), but has been cropped before being input to Star Tracer. These values are used to tell Star Tracer the amount by which the center of the input image differs from the center of the specified lens projection. Output Screen
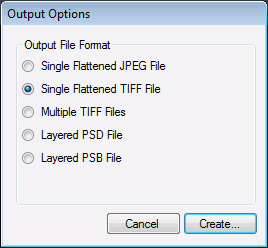
Output Screen
The output screen allows you to choose from the following output formats.
- Single flattened JPEG file. Star Tracer produces a single image in JPEG format. This image is a composite, created by blending all of the individual rotated images, using the brightest value at each pixel location. This is similar to Photoshop's "Lighten" blending mode.
- Single flattened TIFF file. Same as above except in TIFF.
- Multiple TIFF files. Star Tracer produces multiple TIFF files, one for each rotation.
- Layered PSD file. Star Tracer produces a layered PSD file, with one layer for each rotation.
- Layered PSB file. Same as above except in PSB format.
Following are a list of menu choices.
- File
- New Project Starts a new, empty project
- Open Image Opens an image in the image window
- Open Project Opens an existing project
- Save Project Saves project
- Save Project As Prompts for a filename and saves project
- Tools
- Retrieve field-of-view from EXIF data Attempts to extract field-of-view information from image EXIF data and populate the field-of-view field
- Show line with worst fit Pans image to show the star line with the worst fit...useful for identifying incorrectly placed star lines
- Options Show options screen
- Show application messages Shows/hides the application messages panel
- Mask drawing mode Turns mask drawing mode on/off
- Help
- Contents Shows this help document
- Register Shows dialog where a registration code can be purchased and entered in order to unlock full version of program
- About Shows version information
Star Lines. How many star lines should be drawn on the image?
The number of star lines required varies based on a number of factors:
- How long are the trails in the image? In general, longer star lines give the optimizer more information and are less prone to minor placement errors. If the image only has short trails, adding more lines can help the optimizer produce reliable results.
- Is FOV known, or being estimated by the optimizer? The optimizer may not always produce reliable estimates of FOV, but adding more star lines increases the chances of a good estimate.
- How accurately are the lines placed? More lines can offset minor placement errors in the position of the star lines.
- How many parameters are being estimated by the optimizer? If you choose to optimize some of the advanced lens parameters, then adding more lines can help produce reliable results.
In general, it is recommended to create at least 10 lines per project. However, depending on the factors described above, you may wish to add more. In some rare cases, (e.g. unknown/optimized FOV, unusual lens distortion, optimized advanced parameters, short start-trails, etc. ) adding up to 100 lines or more may prove beneficial.
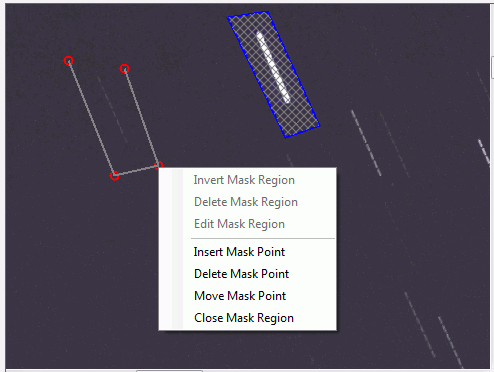
Masks. A "mask" is a region of the image that is excluded from processing when Star Tracer rotates the image. For example, you may wish to mask all "non-sky" regions of the image so that the resulting output image(s) only contain the sky and stars. Star Tracer allows you to create one or more masks when in "Mask Drawing Mode" (activated using the Tools menu). In this mode, you can draw mask regions on the image by creating a collection of points to define a mask region. Clicking on the image adds mask points to the image. Double-clicking causes the mask region to close, i.e. it connects the first and last point in the collection and "closes" the mask region. Right-clicking on the screen brings up a context menu with additional choices to invert, delete and edit a mask region. Right-clicking on existing mask point offers options to move and delete that point.
Star Tracer Masks
Star Tracer's mask creation capabilities are quite flexible, but in some cases you may wish to take advantage of the controls offered by a full-featured image editing program (like Photoshop) to create more complex masks, by adding a fourth (sometimes called "alpha") channel to your image. Most images only contain three channels (red, green and blue). However, if the image contains a fourth channel, that channel is used as a mask by Star Tracer. Consult the documentation for your prefered image editing program to learn how to create a mask for your image. Note that TIFF files can store a fourth channel, but not JPEG files. Bugs and Problems
As hard as software developers try, most programs contain some bugs. If you find a bug in Star Tracer please feel free to contact the author (see Star Tracer's page for contact details).
When reporting a problem, please give as much information as possible. A good bug report is one that allows the developer to reproduce the problem using the steps that you provide. A step-by-step recipe that allows the developer to replicate the problem is likely to result in a quick diagnosis and resolution. Reports with vague wording such as "I saw an error message" or "it doesn't work" make the diagnosis and resolution difficult or impossible.
If reporting a bug, please explain what happened (what image format, what dimensions, what were you trying to do, what buttons did you push, etc.). Please do not send your image(s) unless the author asks for them. Most importantly, please provide a step-by-step recipe that can be followed to elicit the problematic behavior...if the problematic behavior can be replicated, it can usually be solved. If not, a solution is often difficult or impossible.
More information is always better, and is more likely to lead to a solution...Thanks!
- Star Tracer homepage.
Purchasing a License and Registering Star Tracer
Star Tracer is free to download and use. However, until it has been registered, the images that it generates contain a number of small watermarks. Use the registration screen (the Help | Purchase/Register... menu option) to purchase and/or enter a registration code. The license code for Star Tracer can be purchased online (using the "Register online..." button), and that license code should be entered into the registration screen's input fields.
All license codes are purchased online using the Kagi purchase processing service.
- Star Tracer homepage.
- Star Tracer discussion forums.
- Image Gallery containing several images produced with Star Tracer.