Hacking the Xiaomi Yi Action Camera
August 2015
Introduction
The Xiaomi Yi action camera was introduced in early 2015. It is similar in many respects to some of the popular GoPro cameras, but costs considerably less (about $70 as of August 2015). Unlike many of the cheap GoPro competitors, the Xioami Yi has an excellent sensor (16 megapixel Sony Exmor R BSI CMOS) and processor (Ambarella A7LS), and is capable of producing excellent images and video. Unfortunately, straight out of the box, its performance isn't nearly as good as it could be. This page describes some tweaks and modifications that can dramatically improve this camera's image quality.
Image Quality Weaknesses
The Xiaomi Yi has an excellent 16 megapixel sensor and a 155 degree fisheye lens that is surprisingly sharp across the most of the frame. By default, the images it produces are pretty good, but there are a number of issues that negatively affect image quality:
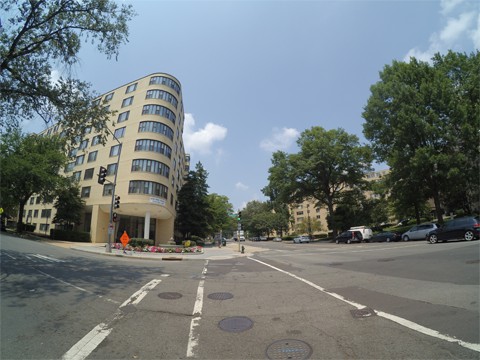
- Poor Focus. The camera has a fixed-focus lens that has been pre-focused at the factory. Unfortunately, it seems that the Xiaomi Yi has been focused for the "selfie enthusiast", optimally focused on subjects only a few feet from the camera. My guess is that this was a deliberate design decision. After all, with such a wide-angle lens and small sensor, even if the camera is focused at 6 feet, the depth of field is enormous, and subjects at much greater distances are technically "in focus" as well. The problem is that "in focus" doesn't mean optimally focused (see my depth-of-field calculator for more information). And, in the case of the Xiaomi Yi, objects at distances of more than about 20 or 30 feet appear visibly softer than those at 6 feet, even though they are all technically "in focus". Interestingly, when viewing the video produced by the Xiaomi Yi it is much harder to detect this focus problem than when looking at the still images. This is because the video is 1080P, so each individual video frame only contains 2 million pixels. In contrast, the still images contain 16 million pixels, making this focus problem much more apparent. When downsized from 16 million to 2 million pixels, the softness in distant objects is hard or impossible to detect.
- High ISO. By default the Xiaomi Yi typically chooses fast shutter speeds. This probably makes sense for an action camera that might often be in rapid motion, and slow shutter speeds could produce blurry images. However, in order to achieve these fast shutter speeds, the Xiaomi has to also use a high ISO setting. Higher ISO settings add noise and reduce detail in images.
- Aggressive Noise reduction. The Xiaomi Yi shoots JPEG images, and applies an aggressive amount of noise reduction to the images. As a result, the images look very smooth, but a lot of fine detail has been lost. Perhaps to counteract the detail loss as a result of the noise reduction, the Xiaomi Yi applies a considerable amount of sharpening to the image. The result is that distant objects often appear plasticky and featureless.
- JPEG only. The camera only produces JPEG images. RAW files are favored by many photographers for their ability to allow for much greater post-processing latitude than JPEG images.
 |
 |
| Viewed at small sizes, the images from Xiaomi Yi look good... | ...however, viewing at 100% reveals poor focus and loss of detail due to aggressive noise reduction |
Improving Image Quality
Luckily, all of these problems can be solved with some minor hacking. This is probably a good place to issue a standard disclaimer that hacking your camera will almost certainly void the warranty, and could damage or break the camera. That said, I haven't experienced any problems doing anything described here.
- Focus adjustment. As mentioned above, the camera's focus was fixed at the factory and was not designed to be adjusted by owners. However, it isn't impossible. The lens' focus can be adjusted simply by rotating it. Rotating clockwise makes it focus at longer distances; counter-clockwise rotation causes it to focus at shorter distances. In order to rotate the lens, the camera's case must be opened and some glue that normally prevents the lens from rotating must be removed. Youtube has many videos that illustrate how to do this. Most users find that a small clockwise rotation of about 15-20 degrees causes the camera to be optimally focused at longer distances.
- Manual selection of ISO, exposure, whitebalance, noise reduction (and more). The Xiaomi doesn't offer the user any ability to change many important photographic options such as ISO, shutter speed, white-balance, etc. However, it turns out that the Xiaomi has an undocumented "back door" that allows for adjustment of these parameters as well as many others: When the camera starts up it checks to see if there is a file on the SD card with a name of "autoexec.ash". If so, it will read that file and execute any commands contained in that file. The commands are undocumented, but intrepid hackers have already worked out what commands can be used to adjust exposure length (shutter speeds of up to 8 seconds), ISO (100, 200, 400, 800, 1600, 3200, 6400, 12800, 25600) and to disable auto-whitebalance (which sets the white-balance at a daylight preset). The Xiaomi Yi's noise reduction can be turned down somewhat, but not completely disabled (not yet, at least). There are many resources on the web with information about the autoexec.ash file and the commands that can be used to adjust the Xiaomi Yi's settings. Here are a couple of good places to start reading: one, two.
- RAW format. The autoexec.ash file can also be used to force the camera to produce raw files (in addition to the JPEG images that the camera produces). Raw files contain the raw sensor data prior to any sharpening, noise reduction, contrast adjustment, white balancing and compression. All these adjustments can be made later when processing the images. When raw capture is enabled on the Xiaomi Yi, it will create two files for each shutter press: one with a "jpg" file extension and the other with a "RAW" extension (e.g. YDXJ0298.jpg and YDXJ0298.RAW). The raw files aren't in a format that is readily readable by most software, but can be easily converted (details below) to a standard DNG file which can be opened by Photoshop and other image editing software.
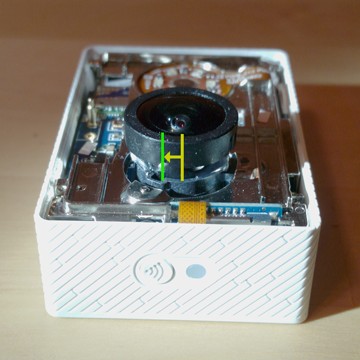
Rotating the lens clockwise by about 10-15 degrees
produces much better focus on distant objects
 |
 |
| Even afer focus adjustment, setting ISO 100 and turning down noise reduction as much as possible, JPEG images still exhibit loss of fine detail... |
RAW file allows for exposure and white-balance adjustment (shown here) as well as retention of much more fine detail |
Xiaomi Yi Configurator (XYC)
Although the autoexec.ash file allows the user to adjust the settings on the camera, it isn't always convenient or easy to adjust the contents of the file, particularly when out "in the field" photographing. My solution was to create a small program called "Xiaomi Yi Configurator" (XYC) that runs inside the camera and allows the user to configure exposure, ISO and other settings via an interactive menu. Once the user has changed the settings, XYC creates a new autoexec.ash file and the settings are applied next time the camera starts.
XYC takes advantage of the fact that the camera runs a small version of the Linux operating system, and can run a telnet server. This means that any telnet client can connect to the camera and run the XYC program on the Xiaomi Yi camera. Telnet clients are freely available for all operating systems (e.g. Windows, iOS, Android, iPhone, Unix, etc.) This makes XYC a truly cross-platform approach for changing settings on the Xiaomi Yi camera. This thread has more details on accessing the Xiaomi Yi using telnet.
The steps for running XYC vary a little depending on what type of computer or phone you are using and the specifics of your telnet client software, but the general procedure is as follows:
- First time only: Copy the xyc.sh file to the top level of the camera's micro SD card.
- First time only: Create an empty file (no contents) named "enable_info_display.script", and place this at the top level of the camera's micro SD card. This file instructs the camera to start the telnet server when the camera turns on.
- Turn on the Xiaomi Yi's wifi, and connect your computer/phone to the xiaomi Yi's wifi network. (Using the official Xiaomi Yi app to connect to the Xiaomi Yi's wifi network may be helpful in this step).
- Use your telnet client to establish a telnet connection to the Xiaomi Yi. the IP address for the camera is 192.168.42.1. The user ID is "root", and there is no password.
- First time only: If this is the first time you are running XYC, you will
need to change the file permissions for xyc.sh so that it can be executed. In
order to do this, type the following command at the telnet console:
chmod 755 /tmp/fuse_d/xyc.sh
- Run XYC with the following command:
/tmp/fuse_d/xyc.sh
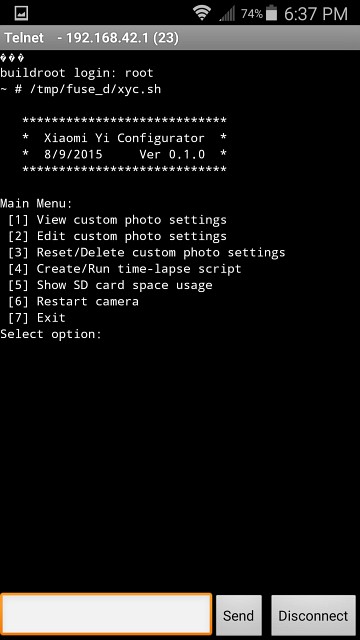
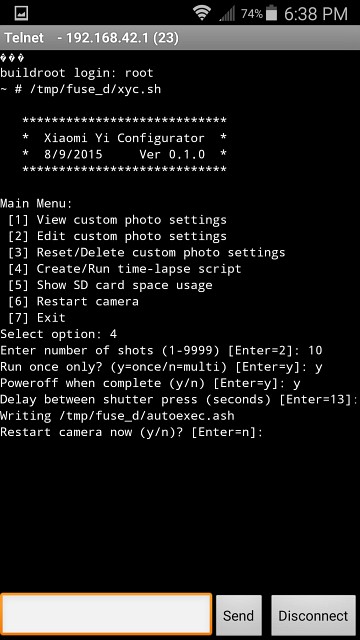
- XYC will present a menu of choices that allow you to view/adjust camera settings (exposure, ISO, auto-whitebalance, noise reduction and RAW format). Type a number to select a menu choice. Settings can be changed by entering numeric values or "y" or "n" responses. In most cases hitting "enter" will retain the default/current value for a setting. XYC also allows you to create a time-lapse script that will execute the next time the camera starts. The camera's built-in time-lapse feature does not appear to work correctly with RAW files, so XYC's time-lapse feature may be useful instead if shooting RAW files.
- After making any desired configuration changes, restart the camera in order for them to take effect.
 |
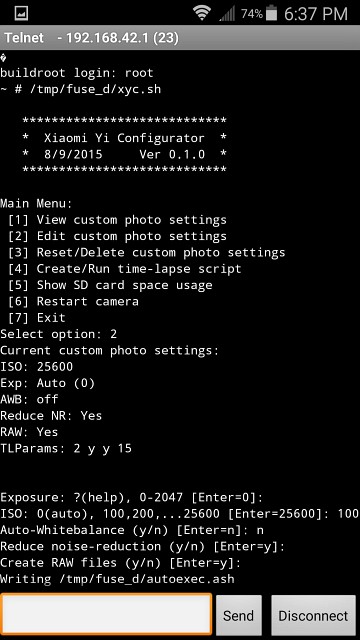 |
| XYC main menu on an Android phone | XYC settings adjustment using an Android phone |
 |
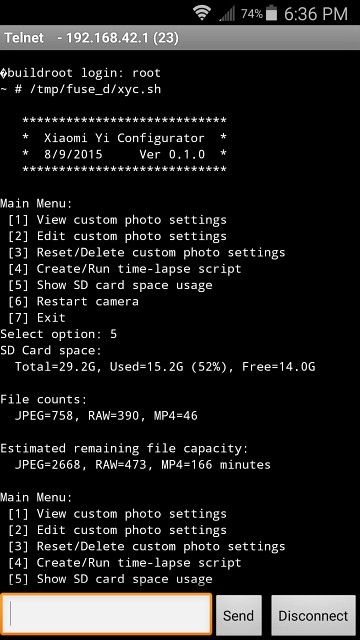 |
| Creating a time lapse script | Showing SD card information |
Creating DNG Raw Files
The raw files produced by the Xiaomi Yi need to be converted to a DNG format so that they can be read by standard raw processing software. I use a modified version of the procedure outlined in this thread. In order to create DNG files from the Xiaomi Yi's raw files, two steps are necessary:
- Run raw2dng, a program originally created for Nikon Coolpix cameras but also works well with the Xiaomi Yi files, to convert the raw data into a DNG file. I use the command-line version of this program (available here) rather than the graphical version because it allows for the automation of DNG creation (see below)
- Run exiftool (available here) to modify the "whitelevel" and "blacklevel" points in the DNG file, and embed XMP metadata so that the DNG files open in Adobe Camera Raw with defaults that approximate the appearance of the Xiaomi Yi's JPEG images.
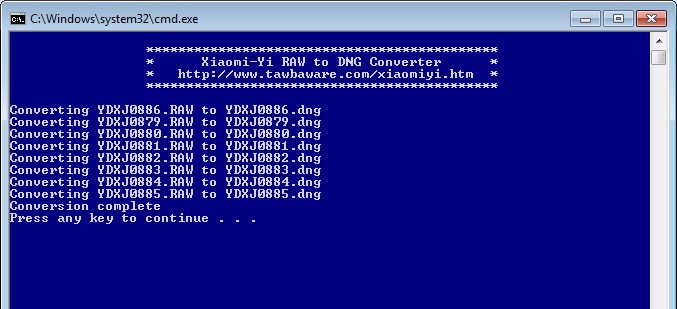
Converting RAW files to DNG format
Final Thoughts
The Xiaomi Yi is a great little camera, but it is a pity that it comes from the factory with a lens focused for the selfie-enthusiast and image settings that destroy a lot of the detail that the camera is capable of capturing. I hope that a future version of the Xiaomi Yi (a Xiaomi Yi Pro, perhaps?) might be targeted towards photographers who want more manual control over the camera and the ability to capture detailed landscapes where distant subjects are well focused. The current Xiaomi Yi can be hacked to do this, but most people won't bother, and if they look too closely at the images may end up concluding that the camera just isn't very good.
Downloads
- Xiaomi Yi Configurator (XYC) program and raw conversion batch file (Version 0.2.0. Updated Dec 5 2015)
Links and More Reading
- Discussion forum for Xiaomi Yi camera
- Max Lyons Software: http://www.tawbaware.com/
- Max Lyons Image Gallery: http://www.tawbaware.com/maxlyons
- Contact: maxlyons@tawbaware.com