|
November 2006 Update: This first version of this review was written in 2004, when I tested the original Panosaurus. I've recently had the opportunity to test a newer, improved model of the Panosaurus and have updated this review as a result. Because the new and original models of the Panosaurus are so similar, I am adding to the original review by adding comments in this color, rather than rewriting it. 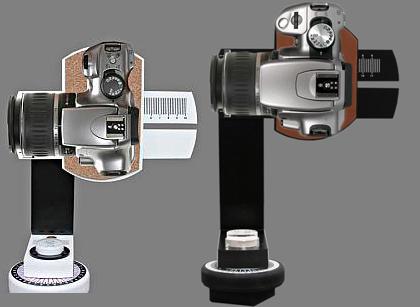 The original (left) and current (right) models of the Panosaurus Introduction. In order to create stitched panoramic and mosaic images, it is highly recommended to use a tripod with a panoramic tripod head so that the camera rotates around the lens' "exit pupil". Unforuntately, panoramic tripod heads tend to be very expensive, and are usually quite heavy and bulky. Until now. Greg Rubottom has created a panoramic tripod head that weighs half as much as the competition and costs a fraction of what competing "professional" models command: The Panosaurus Tripod Head. What is it? The Panosaurus Tripod Head is a low-cost, light-weight panoramic tripod head that allows the user to position the camera so that all traces of parallax error are eliminated. Parallax errors are the most common reason why most stitching programs fail to assemble panoramic images correctly. For a great description of parallax error (and a visual example) have a look at Sascha Kerschhofer's page. Who needs it? If you understand parallax error, you'll understand why a panoramic tripod head is important for anyone creating stitched images. If the images that are to be stitched into a panorama or mosaic suffer from parallax error, they will never line up correctly. Some software programs (such as PTAssembler) allow the user a lot of ability to edit the final image, and in many cases some or most of this parallax error can be disguised...but never removed. Much better to start stitching with a set of images taken with a panoramic tripod rather than trying to eliminate parallax errors after the images have been taken. Construction. The Panosaurus is made of expanded PVC plastic and weighs under 2 pounds. It comes in several pieces with a bag of screws, knobs and bolts. Some assembly required! But, the assembly is pretty straightforward, and all you'll need are the instructions on the Panosaurus web site, and a screwdriver...in fact, you can assemble the entire head with a penny, if a screwdriver isn't available. You will also need a tripod on which to mount the Panosaurus. There are no special requirements for the tripod as the Panosaurus mounts on top of a standard 1/4" bolt. It takes a few minutes to determine the correct positioning for your camera and lens, but the exercise only needs to be performed once for each lens (or at each focal length you intend to use for your panoramas). November 2006 Update: It is clear that Greg has listened to his customers
and the current Panosaurus has been refined and improved in many ways. A lot of
the changes are incremental, but add up to a more polished, easier to use
product. the most important (for me) changes that I noticed were the following:
Features. The Panosaurus allows the camera to rotate around the exit pupil of the lens in both the horizontal and vertical directions. Some tripod heads are only designed to rotate around the exit pupil when rotated in one direction. This is fine if all you ever intend to shoot is single row panoramas. However, if you intend to shoot mosaic images (where images are stitched both vertically and horizontally), then you'll need a tripod head that allows rotation around the exit pupil in both directions. These types of heads are sometimes called "spherical" tripod heads. The head features a built in bubble level that allows the user to determine the precise levelling of the tripod head. This is extremely useful when working with a tripod using a ballhead and/or on uneven ground...a real helper for the landscape photographer. It also features finely spaced markings to allow easy calibration and recall of the correct positioning of camera/lens combinations. Although the head does not feature "click-stops" to allow the user to rotate the camera in precise increments, it does have markings that indicate the amount of rotation (in both horizontal and vertical directions). In practice, I've found this to be much more useful than click-stops for a couple of reasons. First, I often use a very long lens...so long that I only need to rotate by a couple of degrees for each image. I've yet to find a "professional" tripod head that offers click stops in such fine increments. Secondly, click-stops are useful if you use a single focal length lens and you know precisely how many degrees you need to rotate the camera for each shot. Much of the time, however, I use a zoom lens, so the amount of rotation varies with the focal length.
The Panosaurus is extremely light weight in comparison to the "pro" models that are currently avaialble. It is also easy to rapidly disassemble into its component pieces. I am able to disassemble the Panosaurus into two pieces (the horizontal upper arm, the base and upper arm) and store it in the outer pouch of my Lowepro Mini Trekker bag in about of minute. The third piece (the camera mounting block) remains attached to my camera and is small enough that it fits into the main storage area of my Mini Trekker. Thanks to the markings on the upper arm, I'm able to reassemble the head and ensure that the camera is positioned correctly in about the same amount of time it takes for me to disassemble it. November 2006 Update: The mounting block of the current model is larger than the original and is a tighter fit inside my camera bag. Although the current mounting block can accomodate all sorts of odd shaped cameras, most people only need the block to fit one camera: the one that they own. It would be a nice idea to provide a selection of different sized mounting blocks. As a fan of small, lightweight, minimalist solutions, the Panosaurus appeals to me. Part of the reason I've never used a "pro" panoramic head before was the size and weight of these devices. The Panosaurus allows a fair amount of adjustment that should permit it to work with many cameras, although you should check to make sure that your camera's measurements will allow it to work with the Panosaurus. It worked fine with my current digital SLR and I expect that it will work with just about any SLR...digital or film. In the field. My first real test of the Panosaurus was on a one week trip to Colorado and Utah in April 2004. I tested it for a week and took over 100 panoramic images with it. In short, I was extremely impressed. It performed its primary function -- the rotation of the camera around the lens' exit pupil -- flawlessly. As a result, the images I captured using the Panosaurus have been the easiest batch that I've ever stitched. Previously, I've used a home-made device (or none at all), and I've spent considerable time hiding and touching up the effects of parallax in the final images. No more. Even images with a considerable amount of foreground prove easy to stitch with no visible parallax errors.
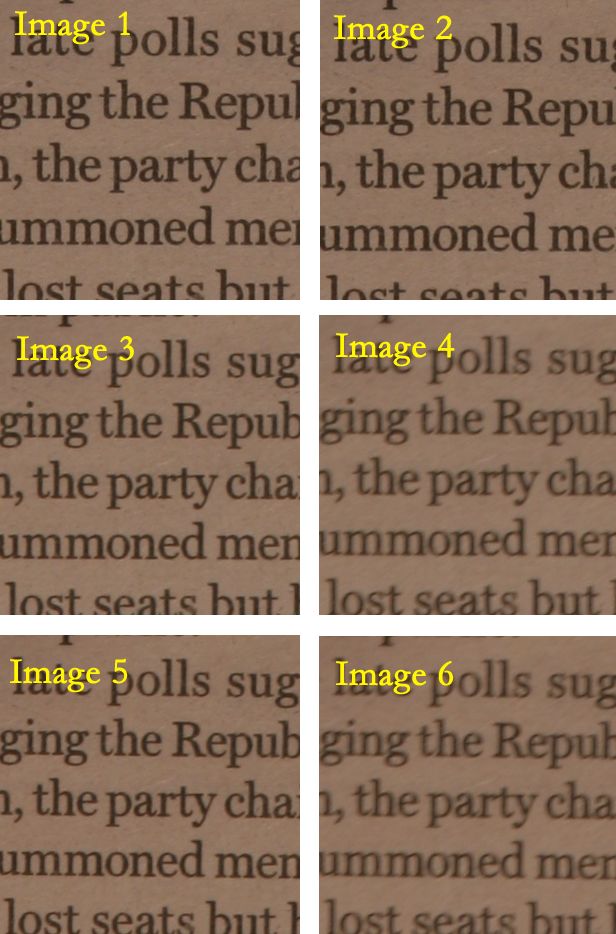
November 2006 Update: I've been using my original Panosaurus for close to three years now, and it is still going strong. The material has held up to a lot of use (and some abuse) with no problem. I was originally unsure as to how well the plastic would hold up, but I'm now convinced that this is an excellent choice of material. Extremely light and strong enough for the job at hand. The worst thing I can say is that I recently lost the clamping knob that connects the mounting block to the upper horizontal arm...user error, in other words! Cons. After my week of field-testing, I did find one area where the Panosaurus could improve...stability. When using my DSLR and my 70-200mm F4 zoom lens (a 4 pound combination), the Panosuarus' light-weight construction proved insufficient to hold it static if there was any wind blowing. On a couple of windy mornings and evenings, I had to resort to shooting without the Panosaurus as it just wouldn't stay steady enough for me to use the slow shutter speeds that are a feature of photography at the start and end of the day. To be fair, Greg mentions that the Panosaurus isn't recommended for camera/lens combinations weighing more than 3 pounds, so I suspect that this is a torture test for the Panosaurus (and other panoramic tripod heads)...to hold such a heavy combination steady in a windy environment. When using my smaller (and lighter) lenses, the Panosaurus proved to be sufficiently sturdy. Although I haven't tried the Panosaurus with a compact digicam, I suspect that it would be sufficiently sturdy under all but the most extreme conditions. Still, perhaps a super-Panosaurus -- a Panosaurus Max, perhaps?! -- could be created for those of us who insist on using heavy cameras and lenses? November 2006 Update: The current Panosaurus is taller than the original model and Greg has made design modifications to try and increase the sturdiness. All other things being equal, I would expect that the increase in the length of the vertical arm would actually make the Panosaurus less stable so I was intrigued to test the current Panosaurus against the original version. Using the same methodology as outlined in my Nodal Ninja and King Pano reviews, I tested the current Panosaurus model against the original Panosaurus model. I also included test shots taken with the camera directly mounted onto the a Bogen 3028 tripod head...a non-panoramic head. Images 4 and 6 show the results from the current (Image 4) and original (Image 6) Panosaurus models. The image produced by the current Panosaurus is slightly sharper (also confirmed by the slightly larger file size when captured using identical JPEG compression settings), but the difference isn't large. Still, given that the current model has a considerably taller vertical arm, this is quite impressive. And, the original Panosaurus was the sturdiest panoramic tripod head I've tested so far.
One other minor niggle was that the mounting block covers the battery compartment on my camera, so when the battery dies, the camera has to be removed from the upright arm, and the mounting block has to be removed from the camera (with a screwdriver or a penny) before the battery can be changed. Not a big deal, but frustrating if the battery dies in the middle of a long sequence of shots. Lastly, after a month of use, the Panosaurus no longer looks as new as it did. Unlike my metal tripod, I've been unable to clean off the mud, food and blood (a minor accident while scrambling up some rocks in Canyonlands) that I've spilled on its unfinished edges. A little of the cork on the camera mounting block has also started to flake off. Nothing that will affect its performance, however. Comparison with "pro" models. Unfortunately, I don't own a professional panoramic tripod head, so I can't comment from direct experience here. (There is a thorough review of three tripod heads on the vrphotography web site.) However, all the pro heads cost about 5-15 times as much as the Panosaurus, weigh about twice as much, and none of them are as compact and easy to store...all reasons why I don't own any of them! Conclusion. The Panosaurus is a terrific product at the right price. Sure, it isn't made of black shiny metal, and doesn't look quite as sexy as the $500-$1200 models, but it does exactly the same job for under $100. November 2006 Update: I'm convinced that the Panosaurus is the best "affordable" panoramic tripod head that I've tested. Not only is it cheaper than the other tripod heads on the market, but I believe that it is the only affordable head that really works well for digital SLR photographers who aren't content to shoot only with short and/or light lenses. I still wish for more stability, but this is a problem with all panoramic tripod heads. However, given the Panosaurus' remarkably reasonable price, the quality of its construction, and the current competition, the Panorsaurus is the clear winner for me. Special Offer for PTAssembler users. If you are a registered user of PTAssembler, you are entitled to a $20 discount on the purchase of a new Panosaurus. To take advantage of this offer, please visit this page. Contact Information: Panosaurus web site |