
TawbaWare
Register
ColorFix
Windows:
PTAssembler
Image Stacker
Star Tracer
TuFuse Pro
Thumber
PixelZap
ColorFix
DigiSS
EXIFRead
Framer
FileLister
MinUpTime
HideWin
FileMonitor
Dos:
CamWork
CRead
WordCount
HTMLR
ColorFix
Color Space Converter
Current Version: 1.40, Updated December 18, 2001
Note for Minolta users: The Minolta cameras come with software that converts from one color space to another. However, unlike ColorFix, the Minolta software also applies additional "image corrections" that cannot be controlled by the user...adjustments happen "automatically" with the DiMage software and can often give unpredictable results. ColorFix only changes the color space (unless you explicitly specify additional contrast/color saturation changes), resulting in uniform, predictable color correction from one color space to another.
 |
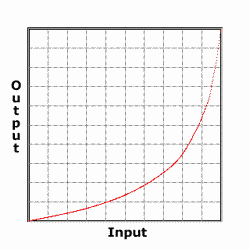 |
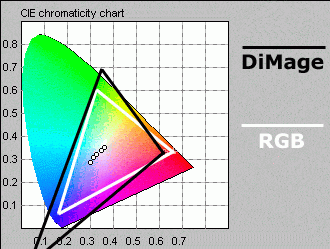
| Comparison of the Minolta DiMage and sRGB (typical monitor) color gamuts | DiMage tonal response curve |
2 minute quick start. ColorFix can be run as a DOS or Windows application. To run the Windows version of ColorFix, simply add the files that you want to correct and click the "start" button to begin correction. To run the DOS version of ColorFix, type colorfix imageName.jpg at the command prompt (make sure ColorFix is in the same directory as the image file or in the DOS path, and replace imageName.jpg with the name of the image file you want to correct). To convert multiple images simultaneously, you can use wildcards such as colorfix image*.jpg. To see a list of all options, type colorfix -? at the command prompt.
Click here if you want to jump to the download section, skipping over the following (interesting and useful!) discussion about color spaces and how to customize ColorFix.
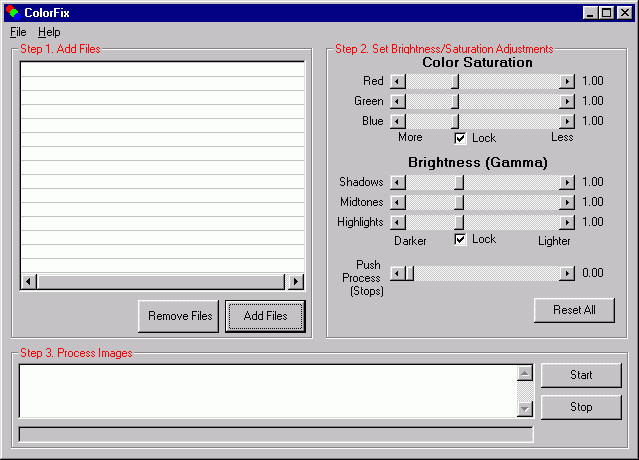
ColorFix can be run as a Windows program...
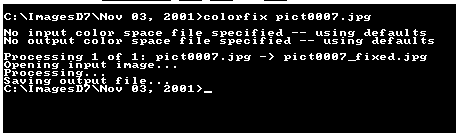
...or as a DOS/Command application
Color Spaces Simplified. Color space theory is quite complex and a full discussion is beyond the scope of this document, although the rest of this document may not make much sense unless you have a general idea what a color space is. (The International Color Consortium (ICC) page has some good reading material). In general, in order to translate between two color spaces, three items need to be known for both the input (e.g. camera) and output (e.g. monitor) color spaces:
- Color gamut
- White point
- Tonal reproduction curve
A color gamut specifies the full range of colors that a device (e.g. digital camera, printer, etc.) is capable of capturing or displaying. The areas within the two triangular regions in the diagram above show two different color gamuts. Colors outside a device's color gamut cannot be differentiated. The white point is a point inside the color gamut that corresponds the devices's rendition of pure white. A tonal reproduction curve (similar to the "curves" tool in an image editing program such as PhotoShop) is a mathematical relationship used to convert a linear representation of color intensities into something more "curved". (This is necessary because of the way the human eye perceives changes in light/color intensity).
If all three of these items (color gamut, white point, and tonal reproduction curve) are known for both the input and output color spaces, then the colors in an image can be converted from one space to another. The mathematics are reasonably straightforward, and are explained in documents found on the Accurate Image Manipulation website.
Under The Hood...what ColorFix Does. ColorFix converts from one color space to another by following these steps:
- "Linearize" the RGB image data using the input color space tonal reproduction curve. This reverses the adjustments that were made by the camera (or input device) when the image was captured. The image data must be linearized so that the color space conversion (see next steps) is accurate. This operation is similar to using the "curves" tool in an image editing program.
- Convert the colors from RGB values to CIE_XYZ values using a conversion matrix derived from the input color space's color gamut and white point parameters.
- Convert the CIE_XYZ color values to RGB values using the conversion matrix derived from the output color space's color gamut and white point parameters.
- Apply the output color space's tonal reproduction curve. Typically, this increases the brightness/contrast of the image, and reverses the transformation applied in the first step.
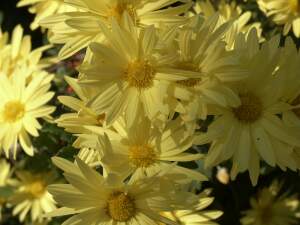
ColorFix Default Behavior. By default, ColorFix is designed to work with images produced by the Minolta DiMage 5 and 7 digital cameras. As such, the correction is quite subtle. It uses the color profile shipped with the Minolta Dimage Image Viewer (DIVU) software as the input color space, and a modified version of the sRGB profile embedded in DIVU-corrected images as the output color space. ColorFix uses the same tonal reproduction curve and white points for both the input and output color spaces, which means that the correction does not affect the overall contrast and/or whitebalance of the image. In fact, the only differences between the input and output color spaces are the color gamut parameters. The net result is that the corrected colors appear more natural--greens become a little brighter and "greener", yellows and blues become a little more intense and the reds become a little less saturated.
 |
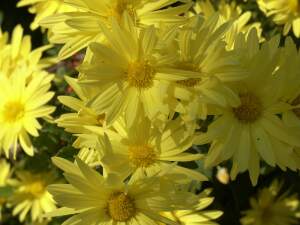 |
| Before correction | After color correction, yellows become more intense |
 |
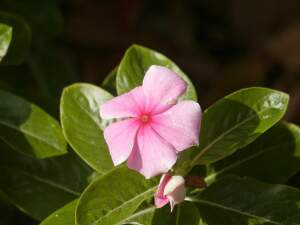 |
| Before correction | After color and contrast correction, greens become "greener" and lighter |
Contrast/Saturation Adjustments. ColorFix's default behavior can be adjusted in a number of ways. To change the brightness of the output image, use the brightness/gamma controls ("-g" command-line options). These effectively increase or decrease the "curviness" of the output tonal reproduction curve. Values of greater than 1.0 reduce the contrast (lightening shadows, useful for the DiMage's normally high-contrast images). Values of less than 1.0 increase the contrast. A value of 1.0 produces no change. For more control, you can adjust the low values (shadows), middle value (midtones) and high values (highlights) of the tonal reproduction curve independently using the -gl, -gm and -gh options. A common criticism of the Minolta DiMage images is that they are too "contrasty" with very dark shadows. Using a command such as colorfix -gl1.3 pict0001.jpg can lighten up the shadows, revealing previously hidden detail.
An alternative approach to brightening an underexposed image is to use the "push-processing" feature. This simulates the traditional film development process where film is developed for a longer period than normal in order to produce a lighter image from an underexposed negative. ColorFix's push-process feature works by boosting the brightness values for each pixel after the image data has been "linearized", preventing contrast shifts that can occur using traditional brightening techniques. Underexposing an image (in the camera) by one stop, and then push-processing the image by one stop effectively simluates a doubling of the camera's ISO setting. Note: As with film-based push processing, this technique can increase the amount of noise/grain in the final image.
To change the saturation of an image, use the saturation controls ("-s" command line options). Values smaller than 1.0 effectively "shrink" the size of the triangular color gamut (see diagram above) for the output color space. The result is that colors become more intense, or saturated. For more precise control, you can adjust the red, green and blue values independently using the -sr, -rg, -sb options.
Customzing ColorFix. For advanced configuration, all 3 relevant color space items (color gamut, white point, tonal reproduction curve) for both input and output color spaces can be specified in text (i.e. human-readable) configuration files. Custom configuration files can be accessed using the "-i" (input) and "-o" (output) command line options (DOS and Windows versions).
To make colorfix as convenient to use as possible, the syntax for its configuration files is compatible with the output from Graeme Gill's iccdump program. ColorFix reads a subset of the ICC tags that are output by the iccdump program. In particular, ColorFix reads the rTRC, gTRC, bTRC, kTRC tags that define the tonal reproduction curve, the rXYZ, gXYZ, bXYZ tags that specify the color gamut and the wtpt tag to specify the white point. Note: if the tonal reproduction curve is only partly specified (i.e. some points are omitted), the missing points are generated using linear interpolation from neighoring points. Adjusting the output tonal reproduction curve is useful for creating custom "curves" similar to what can be achieved using image editing software. Consult the example config files (inCfg.txt and outCfg.txt) that are distributed with ColorFix for more details and examples. (Spaces and capitalization in the configuration file are important). Here's a message I posted on a bulletin board with some more detail on using custom color spaces.
Notes and restrictions.
- The color profile information that is shipped with the Minolta DiMage cameras (used for ColorFix's default behavior) is designed to work with images taken with the camera's contrast/saturation settings set to zero. Using ColorFix to correct images taken with other contrast/saturation settings may produce undesired color shifts. However, in most cases the DiMage profile works very well, even for images with non-zero contrast/saturation settings. Ideally, Minolta would have supplied color profiles with the DiMage corresponding to each setting. Perhaps Minolta felt that the default profile is "close enough" for use with other settings.
- ColorFix only works with JPEG and TIFF (and BMP for output) images. Not RAW. There are no immediate plans to change this.
- Although the ColorFix syntax is compatible with the output from the IccDump program, it does not read every tag produced by the IccDump program. Only the tags noted above are read.
- Note: ColorFix does not "embed" any ICC profiles into the images that it produces. For this, you should use more specialized color-space enabled software such as Photoshop.
| Downloads |
|
Distribution Status. ColorFix is distributed as shareware, meaning you are expected to "register" it (i.e. pay $17) to purchase the program. While ColorFix will operate without registration, it is limited to processing images with sizes no larger than 1280x960 pixels. ColorFix comes with no warranty and TawbaWare and the author take no responsibility for any damages caused by the use of this program.
Back to Tawbaware HomePage